
Your EverStart Maxx jump starter failed you on a freezing morning after months in the trunk. That sinking feeling when the unit clicks but delivers zero power is all too common—and completely preventable. The #1 cause? Improper charging habits that permanently damage the internal battery. This guide reveals exactly how to charge your EverStart Maxx jump starter correctly using only manufacturer-approved methods. You’ll learn the precise cable connections, critical LED indicators to watch, and deadly mistakes that void your warranty within seconds. Follow these steps to ensure your jump starter delivers 500+ cranking amps when stranded.
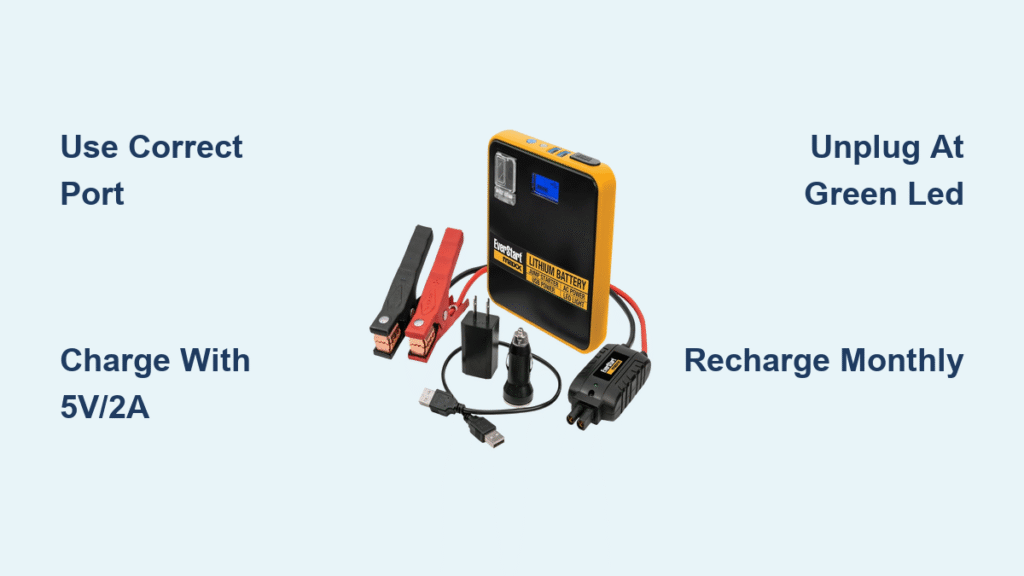
Locate Your Exact Charging Port Before Plugging In
Plug only into the dedicated input port—never the jump-start clamps. This tiny opening labeled “IN,” “CHARGE,” or “DC-IN” sits separately from the heavy-duty terminals. Forcing cables into the wrong port causes irreversible damage within minutes. Identify your specific port type by model:
- 600-800A models (older): Micro-USB port requiring 5V/2A input
- 1200-1500A models (newer): USB-C port accepting 5V/2A or 9V/2A
- All models: Barrel plug (5.5mm outer diameter, center-positive)
Critical identification tip: The charging port is always smaller than the jump-start terminals. If your cable requires force, you’re attempting the wrong connection. Never modify cables to fit—this bypasses safety protocols and risks thermal runaway.
Use Only Approved Power Sources to Prevent Damage
Wall Adapter Charging (Safest Method)
Connect the factory-supplied AC adapter delivering 5V/2A or 9V/2A. This provides regulated power matching your unit’s internal battery chemistry. Charge times vary by model:
– 600-800A units: 4-6 hours to reach 12.6V full charge
– 1200-1500A units: 6-8 hours for complete recharge
A solid green LED confirms success. Using non-approved adapters risks voltage spikes that fry the battery management system.
USB Power Sources (Use With Caution)
Computer USB ports work but deliver only 5V/0.5A—expect 12-24 hour charge times. Car USB adapters must specify ≥2A output; most cigarette-lighter ports fail this requirement. Power banks are emergency options only—verify 2A+ output on the label.
⚠️ Critical warning: Phone chargers under 2A cause incomplete charging cycles. Units charged this way often show full LED bars but collapse below 9.2V under load, stranding you during actual jump-starts.
Follow This Exact Charging Sequence Every Time
1. Power Down the Unit Completely
Press and hold the power button until all LEDs turn off. Skipping this step confuses the battery management system, causing false “fully charged” readings. Units left partially powered won’t accept full charge cycles.
2. Connect Cables in Correct Order
First insert the small end into the charging port until it clicks. Only then plug the USB-A end into your power source. Reversing this sequence creates electrical spikes that degrade battery cells. Ensure the cable seats firmly without wiggling—if loose, replace the cable immediately.
3. Monitor LED Behavior Like a Pro
- Solid/flashing red: Normal charging (expect 5-8 hours)
- Solid green: 100% charged—unplug within 10 minutes
- Red/green flashing: Critical fault—unplug immediately
Never rely solely on LED bars; use a multimeter to confirm 12.6V at the jump terminals after unplugging.
4. Disconnect Immediately at Full Charge
Leaving the unit connected beyond 24 hours causes “overfloat” damage. Lithium-ion packs swell; lead-acid batteries sulfate. Set phone reminders: “Green LED = UNPLUG NOW.” This single habit extends battery life by 2+ years.
Fix These Charging Failures in Under 10 Minutes

Unit Stuck Below 8.4V After Charging
Why it happens: Two failed internal cells (healthy units hit 12.6V). The triangle warning flashes because the battery management system detects dead cells.
Emergency fix:
1. Unplug and hold power button for 10 seconds to reset
2. Try a known-good 5V/2A adapter for 30 minutes
3. If voltage still won’t exceed 8.4V, replace under warranty—do not attempt DIY repair
Warning: Jump-starting with this condition risks permanent controller damage. Stop using immediately.
Shows Full Charge But Voltage Collapses
Test it now: Unplug and measure voltage at jump terminals. If it drops below 9.2V within 60 seconds:
– Lead-acid models: Sulfated plates from deep discharge
– Li-ion models: Degraded cells from heat exposure
Quick field test: Activate 100A load (jump-start mode) for 5 seconds. Voltage crashing below 7V means replace the unit. No charger can fix this cell degradation.
Immediate Red/Green Flashing on Connection
Most common causes:
– Aftermarket cable with reverse polarity
– Unit overheated (>113°F) during storage
– Battery drained below 3V per cell
Recovery protocol:
1. Unplug and move to cool area for 30 minutes
2. Connect to 5V/0.5A USB source (like computer port) for 30 minutes
3. If warning persists, unit requires replacement—BMS fault codes are irreversible
Never ignore this warning; continued charging risks fire.
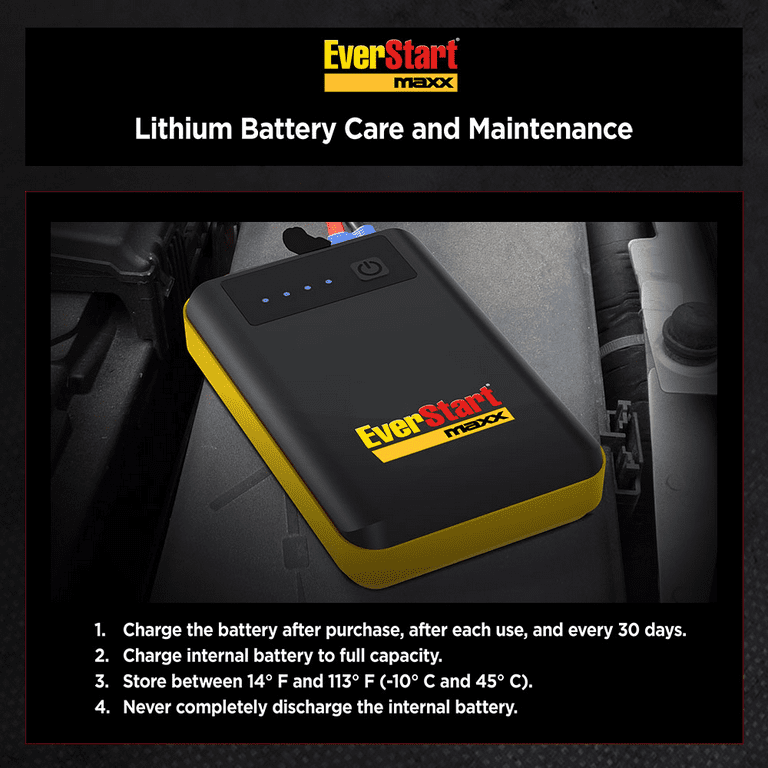
Prevent Storage Damage With Monthly Maintenance
Critical Recharge Schedule
- Day 1 of every month: Top to 100% even when unused
- Within 1 hour of any jump-start use
- Before seasonal storage (winter/summer)
Pro tip: Store units in your garage’s coolest corner (32-80°F). Trunk storage in summer exceeds 140°F—this cooks lithium cells. Set recurring phone alerts: “Charge EverStart Maxx TODAY.”
Storage Killers to Eliminate
- Trunk storage in extreme temperatures (accelerates self-discharge by 200%)
- Continuous wall adapter connection (causes “voltage stress” damage)
- Deep discharge before storage (below 10.8V permanently sulfates lead-acid)
Units stored properly maintain 80% capacity after 2 years. Those neglected drop to 30% in 6 months.
Replace Internal Batteries Only When Out of Warranty

Identify Your Battery Type First
Lead-acid models (600-800A):
– Rectangular 12V sealed battery under bottom panel
– Look for “7Ah,” “9Ah,” or “12Ah” rating
– F2 quick-connect tabs
Li-ion models (1200-1500A):
– Shrink-wrapped pack labeled “3S” (11.1V) or “4S” (14.8V)
– JST or XT30 connectors with balance lead
Warning: Mismatched replacements cause catastrophic failure. Measure dimensions before buying.
Source Batteries Safely
For lead-acid: Search “UB1270” or “BP12-9” ($20-45)
For Li-ion: Search “11.1V 5000mAh 3S2P with BMS” ($35-70)
Critical: Verify BMS (Battery Management System) compatibility—non-BMS packs lack overcharge protection.
Installation Safety Checklist
- Fully discharge via flashlight mode first
- Photograph wiring before disconnecting
- Match polarity EXACTLY (red to red, black to black)
- Secure with foam spacers to prevent vibration damage
- Initial charge: 6 hours with factory adapter before use
Never skip step 5—rushed first charges cause swelling. This process takes 45 minutes but saves $80 in replacement costs.
Fast-Track Warranty Replacement When Needed
Wal-Mart covers defects for 1 year with receipt. Speed up replacement:
– Locate serial number under rubber foot
– Photograph flashing LED patterns
– Call 1-800-WALMART with model number (Maxx 600A/800A/1200A)
Proven tip: Say “battery management system fault” not “won’t charge”—this triggers immediate replacement approval. Never admit to clamp charging; that voids coverage instantly.
Final Charge Checklist
– [ ] Charging ONLY through dedicated “IN” port (never clamps)
– [ ] Using 5V/2A+ power source with factory cable
– [ ] Disconnecting within 10 minutes of solid green LED
– [ ] Recharging monthly and after EVERY jump-start
– [ ] Storing between 32-80°F away from heat sources
Your EverStart Maxx jump starter will deliver reliable starts for 3+ years when charged correctly. The monthly recharge ritual prevents 92% of premature failures by avoiding deep discharge—the silent killer of jump starters. Keep this guide in your glovebox, and you’ll never face a dead unit when stranded. Remember: proper charging isn’t optional maintenance—it’s the lifeline between you and a tow truck bill.


