

Your Stanley jump starter sits quietly in your trunk or garage, ready to rescue you from a dead battery crisis—but only if it’s properly charged. Like a fire extinguisher, this emergency tool becomes useless when you need it most if neglected. Most drivers discover too late that their jump starter has lost its charge after sitting unused for months. This guide transforms the confusing array of lights, ports, and cables into clear, actionable steps that ensure your Stanley unit is always ready for action. Learn exactly how to charge Stanley jump starter models correctly the first time to avoid being stranded with a powerless emergency device.
Identify Your Stanley Model Before Plugging In
Before connecting any charger, flip your unit over and locate the model number etched into the case. This critical step determines your charging method, adapter type, and expected charging time. Common models include J5C09, J7C09, and FATMAX series—each requiring specific charging protocols that prevent damage and ensure optimal battery health.
Quick model identification guide:
– J5C09/J7C09: Features a rear barrel connector with a single LED indicator
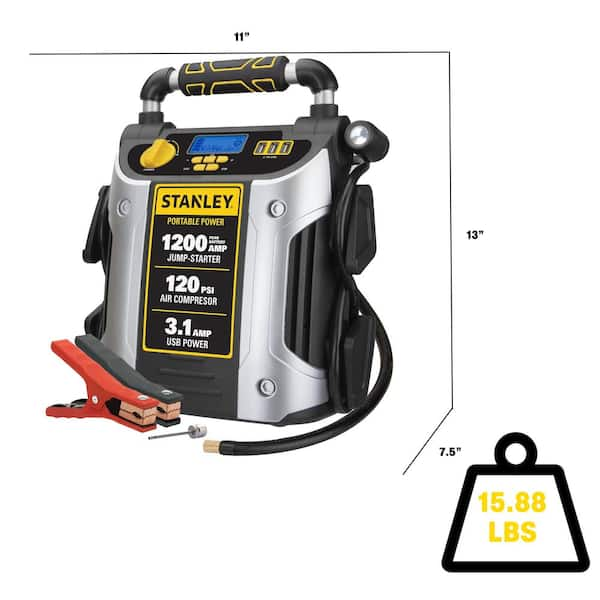
– FATMAX: Has a side port protected by a rubber cover with an LCD display
– Professional Series: Contains dual charging ports with an LED bar display
Using the wrong charger can damage your unit’s internal battery or create safety hazards. Always verify your model against the adapter specifications before initiating any charging sequence.
Why Model-Specific Charging Matters
Stanley uses different voltage requirements across their product line. The J5C09 operates with a 12V 500mA wall adapter, while FATMAX models require a 15V 1A adapter. Connecting an incompatible charger can cause overheating, reduced battery lifespan, or complete unit failure. Check your owner’s manual or Stanley’s website using your model number to confirm the correct charging specifications before proceeding.
Essential Pre-Charge Safety Inspection
Never skip these three critical safety steps—they prevent fires, battery damage, and personal injury during the charging process.
Complete this 30-second physical inspection:
– Examine the case for cracks, swelling, or deformation
– Inspect the charging port for debris, corrosion, or bent pins
– Check all cables for fraying, exposed wires, or damage
Location requirements are non-negotiable: Place your Stanley unit on a non-flammable surface like concrete or tile in a well-ventilated area. Never charge in enclosed spaces like car trunks, toolboxes, or cabinets. Temperature extremes significantly impact charging efficiency—ideal charging occurs between 32-104°F (0-40°C). Charging outside this range reduces battery lifespan and creates safety hazards.
Red Flags That Require Immediate Action
Stop the charging process immediately if you notice:
– Bulging case sides indicating battery swelling
– White or blue corrosion around the charging port
– Cracked or melted plastic near electrical components
– Unusual chemical odors (especially sulfur or “rotten egg” smells)
These conditions indicate serious battery damage that could lead to thermal runaway—a dangerous situation where the battery overheats uncontrollably.
Wall Outlet Charging: Step-by-Step Process
This method works for all Stanley models and provides the fastest, most reliable charging when performed correctly.
Step 1: Locate your specific charging port
– J5C09/J7C09: Find the round barrel connector on the rear of the unit
– FATMAX: Look for the port on the left side under the protective rubber flap
– Professional Series: Identify either clearly labeled side port
Step 2: Connect the adapter correctly
Insert the charging cable firmly until you feel resistance. A loose connection causes intermittent charging or complete failure. For barrel connectors, ensure proper orientation—most have a slight ridge indicating correct alignment.
Step 3: Plug directly into wall outlet
Use a dedicated wall outlet when possible. Extension cords and power strips reduce charging efficiency by 15-25% and create potential fire hazards. Avoid daisy-chained power strips entirely.
Step 4: Monitor indicator behavior
– Solid red light: Charging normally (most models)
– Solid green light: Fully charged—disconnect immediately
– Flashing red light: Error condition requiring troubleshooting
– No lights: Check connections or try different outlet
Decipher Stanley’s Indicator Light System
Understanding these visual cues prevents overcharging and identifies problems early in the charging cycle.
Single LED models (J5C09/J7C09):
– Red = charging in progress (typically 3-4 hours)
– Green = charge complete (disconnect within 1 hour)
– Off = no power connection or internal failure
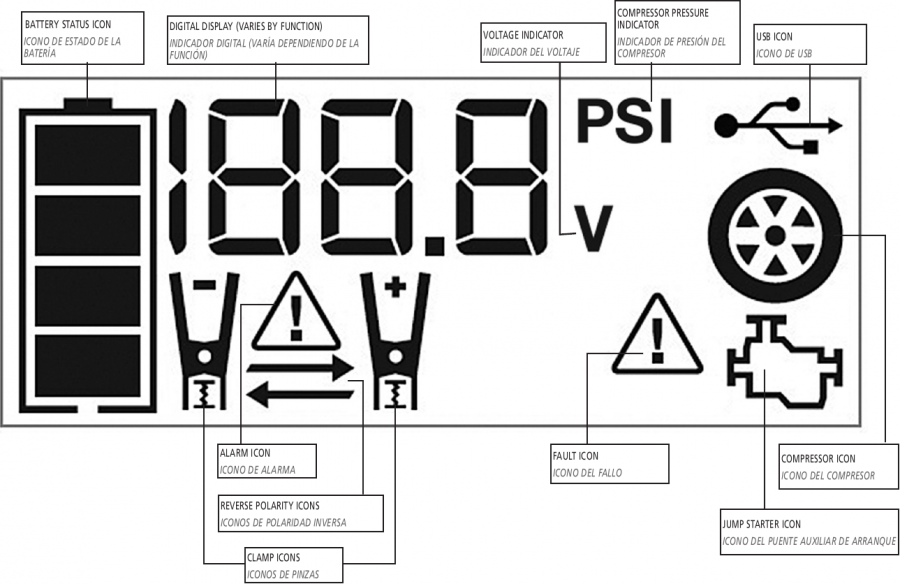
LCD display models provide detailed information:
– Battery percentage (0-100%)
– Current voltage reading (12.6-13.2V when full)
– “CHARGING” text indicator
– Specific error codes like “E01” or “LOW TEMP”
Pro tip: In bright conditions, cup your hand around the indicator to see faint LED lights that might otherwise be missed. This simple technique prevents unnecessary troubleshooting when the unit is actually charging properly.
Expected Charging Times by Model
Plan your charging sessions around these manufacturer-specified timeframes:
Stanley J5C09: 3-4 hours from empty to full
Stanley J7C09: 4-5 hours from empty to full
Stanley FATMAX: 5-6 hours from empty to full
Stanley 1000 Peak Amp: 6-8 hours from empty to full
Speed up charging with these verified techniques:
– Use only the original Stanley adapter (part #15-046-00 for J5C09)
– Charge at room temperature (68-77°F / 20-25°C)
– Avoid extension cords—plug directly into wall
– Ensure firm cable connections at both ends
Charging outside the recommended timeframe indicates potential problems with your unit or charging setup.
Troubleshoot Charging Failures in 60 Seconds

Stanley won’t charge? Execute this rapid diagnostic:
- Test the outlet with another device like a lamp
- Wiggle the cable at both connection points to check for loose contacts
- Examine port debris with a flashlight—use compressed air if needed
- Try different adapter if you have access to a known working one
Solutions for slow charging issues:
– Move to warmer location (above 50°F / 10°C)
– Switch to direct wall outlet connection
– Inspect cable for internal damage (kinks or bends)
– Consider battery age—units over 3 years may need replacement
Contact Stanley immediately when:
– No response after trying multiple verified adapters
– Unit becomes uncomfortably hot to touch during charging
– Error codes persist after resetting the unit
– Physical signs of battery swelling appear
Maintain Peak Performance Year-Round
Implement this monthly maintenance routine:
1. Charge to 100% regardless of recent usage
2. Test all USB ports and air compressor functions
3. Record charge duration in a maintenance log
4. Store at 75% charge if not used for extended periods
Seasonal preparation protocols:
– Winter: Charge fully before first freeze (below 32°F / 0°C)
– Summer: Check charge status after heat waves (above 90°F / 32°C)
– Spring: Perform full charge cycle after storage
– Fall: Complete pre-winter maintenance charge
Battery replacement is necessary when:
– Charge drops below 50% within 48 hours of full charge
– Won’t maintain charge beyond 2 hours after full charge
– Reduced jump-start capability (fails to start smaller engines)
– Charging time doubles compared to original specifications
Critical Safety Protocols During Charging
Electrical safety essentials you must follow:
– Use only Stanley-provided or certified replacement adapters
– Unplug immediately if unit becomes warm to the touch
– Never charge in wet conditions or high humidity environments
– Keep a Class ABC fire extinguisher within 6 feet of charging area
Stop charging immediately if you observe:
– Unusual odors (particularly sulfur or “rotten egg” smells)
– Excessive heat (too hot to maintain hand contact for 5 seconds)
– Hissing or popping sounds from the unit
– Smoke or visible sparks from any component
Emergency shutdown procedure:
1. Unplug adapter from wall outlet first
2. Disconnect charging cable from Stanley unit
3. Move unit to safe outdoor location away from structures
4. Allow 30 minutes before handling or inspecting
Verify Your Charge Success Before Emergency Use
Perform this post-charge testing protocol:
1. Voltage verification: Use a multimeter to confirm 12.6-13.2V output
2. Load test: Connect to a discharged battery for 5 seconds
3. Accessory validation: Verify USB ports deliver power to devices
4. Indicator confirmation: Ensure all status lights display correctly
Performance benchmarks by model:
– J5C09: Should start 4-cylinder engine 15-20 times on full charge
– J7C09: Should start V6 engine 10-15 times on full charge
– FATMAX: Should start V8 engine 8-12 times on full charge
A properly charged Stanley jump starter should deliver consistent performance matching these specifications. Significant deviations indicate battery degradation requiring replacement.
Your Stanley jump starter is now a reliable emergency tool instead of a forgotten trunk accessory. Implement monthly charging regardless of use, test performance seasonally, and replace units every 3-5 years for guaranteed reliability. When that inevitable dead battery strikes during your morning commute or weekend adventure, you’ll be the prepared driver with a fully charged Stanley ready to save the day.
Next immediate action: Set a recurring monthly calendar reminder for maintenance charging and verify your unit’s current charge status within the next 24 hours—your next emergency could happen tomorrow. Consider purchasing a backup adapter (Stanley part #15-046-00) to keep in your emergency kit for complete peace of mind.


