
Your car won’t start, and you’re stranded in a parking lot with a dead battery. That compact red box in your trunk—the NAPA jump starter—is your lifeline to getting back on the road. This powerful 1000-amp device can revive dead batteries in minutes, but only if you know how to use it correctly. One wrong connection could damage your vehicle’s sensitive electronics or create dangerous sparks.
Whether you’re facing your first dead battery emergency or upgrading from traditional jumper cables, understanding how to use NAPA jump starter properly is critical. You’ll avoid common mistakes that leave you more stranded than before and learn the exact sequence that mechanics rely on for safe, reliable starts every time. This guide covers everything from initial setup to cold-weather techniques that work when others fail.
Confirm You Have the NAPA 1000 Peak Amps Model
Before attempting a jump start, verify you’re working with the correct NAPA jump starter model (Part #BK JS1000A). This specific unit features an illuminated voltmeter on the front that displays real-time charge level—your first critical checkpoint before any jump attempt.
Key features to identify your unit:
– Red and black heavy-duty powder-coated clamps with copper jaws for superior conductivity
– Built-in LED work light on the side for nighttime emergencies
– 3.1A USB port capable of charging phones and tablets
– Impact-resistant ABS plastic case with integrated carry handle
Execute the Non-Negotiable Safety Protocol
Safety isn’t optional when dealing with 1000 amps of power. These critical steps prevent damage to your vehicle’s electronics and protect you from injury or fire.
Safety must-dos:
– Power OFF both jump starter and vehicle before connecting clamps
– Keep clamps separated—never let them touch each other during the process
– Confirm 12V compatibility—never use with 6V or 24V systems
– Work in dry conditions—avoid water, rain, or wet surfaces
– Position unit securely—place on flat ground, not directly on the engine
Verify Adequate Charge Level First
Press the power button and read the illuminated voltmeter. You need above 50% charge (12.6V or higher) for reliable starting—anything lower risks leaving you stranded with a depleted jump starter. If the voltmeter shows less than 50%, recharge the unit before attempting a jump start.
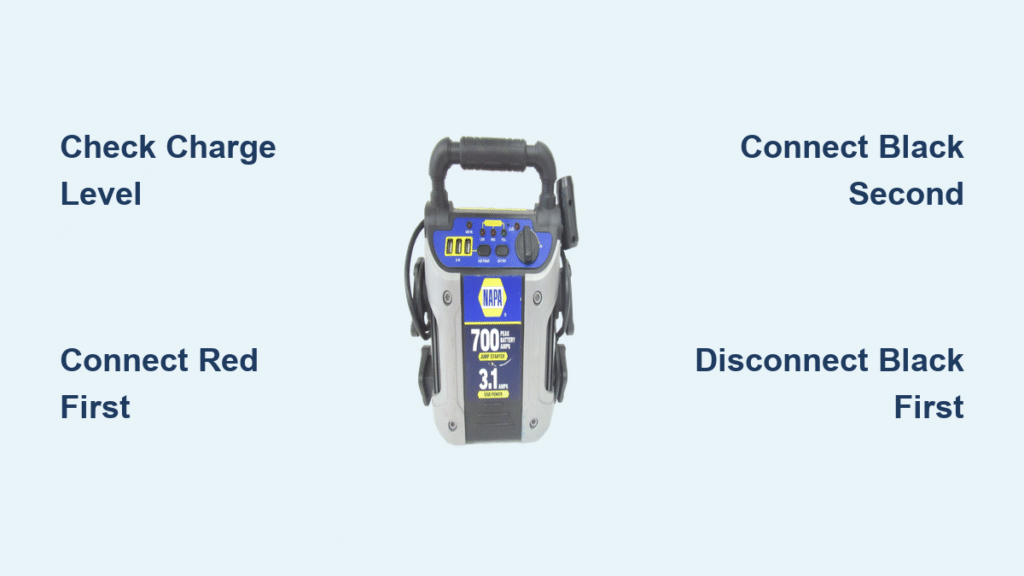
Connect Clamps in the Exact Correct Sequence

The difference between successful jump-starting and expensive electrical damage comes down to connection order. Follow these steps precisely for safe operation.
Positive Connection (Red Clamp)
- Locate your vehicle’s positive battery terminal (marked with “+” or red cover)
- Attach the red clamp securely to this terminal
- Ensure solid metal-to-metal contact—wiggle gently to confirm grip
Negative Connection (Black Clamp)
- Option A: Attach to negative battery terminal (marked with “-“)
- Option B: Connect to unpainted metal surface on engine block or chassis
- Avoid belts, hoses, or moving parts when choosing grounding point
Pro tip: Option B reduces spark risk near the battery, especially important for vehicles with sensitive electronics. Always choose unpainted, clean metal away from the battery itself.
Start Your Engine with Proper Technique
With clamps securely connected, you’re ready for the critical moment. The illuminated voltmeter becomes your diagnostic tool during this process.
Starting Sequence
- Power ON the jump starter
- Observe voltmeter—should read 12V+ with good connections
- Enter vehicle and attempt to start engine
- Crank for maximum 5 seconds—longer attempts overheat the unit
- Pause 30 seconds between attempts if first try fails
Recognizing Success
- Engine cranks normally and starts within 3-5 seconds
- Voltmeter stays above 10V during cranking
- No unusual sounds, smells, or smoke
If your engine doesn’t start after three attempts, stop immediately—you likely have another issue beyond a dead battery.
Remove Clamps in the Critical Reverse Order
The job isn’t done when your engine roars to life. Removing clamps in the wrong order can damage your alternator or the jump starter itself.
Safe Disconnection Steps
- Turn OFF the jump starter immediately after engine starts
- Remove black clamp first—from vehicle, then from jump starter
- Remove red clamp second—from vehicle, then from jump starter
- Store clamps in designated holders to prevent damage
Critical warning: Never let clamps touch each other during removal—this creates dangerous sparks that can damage the unit or cause injury.
Diagnose and Fix Jump Starter Failures
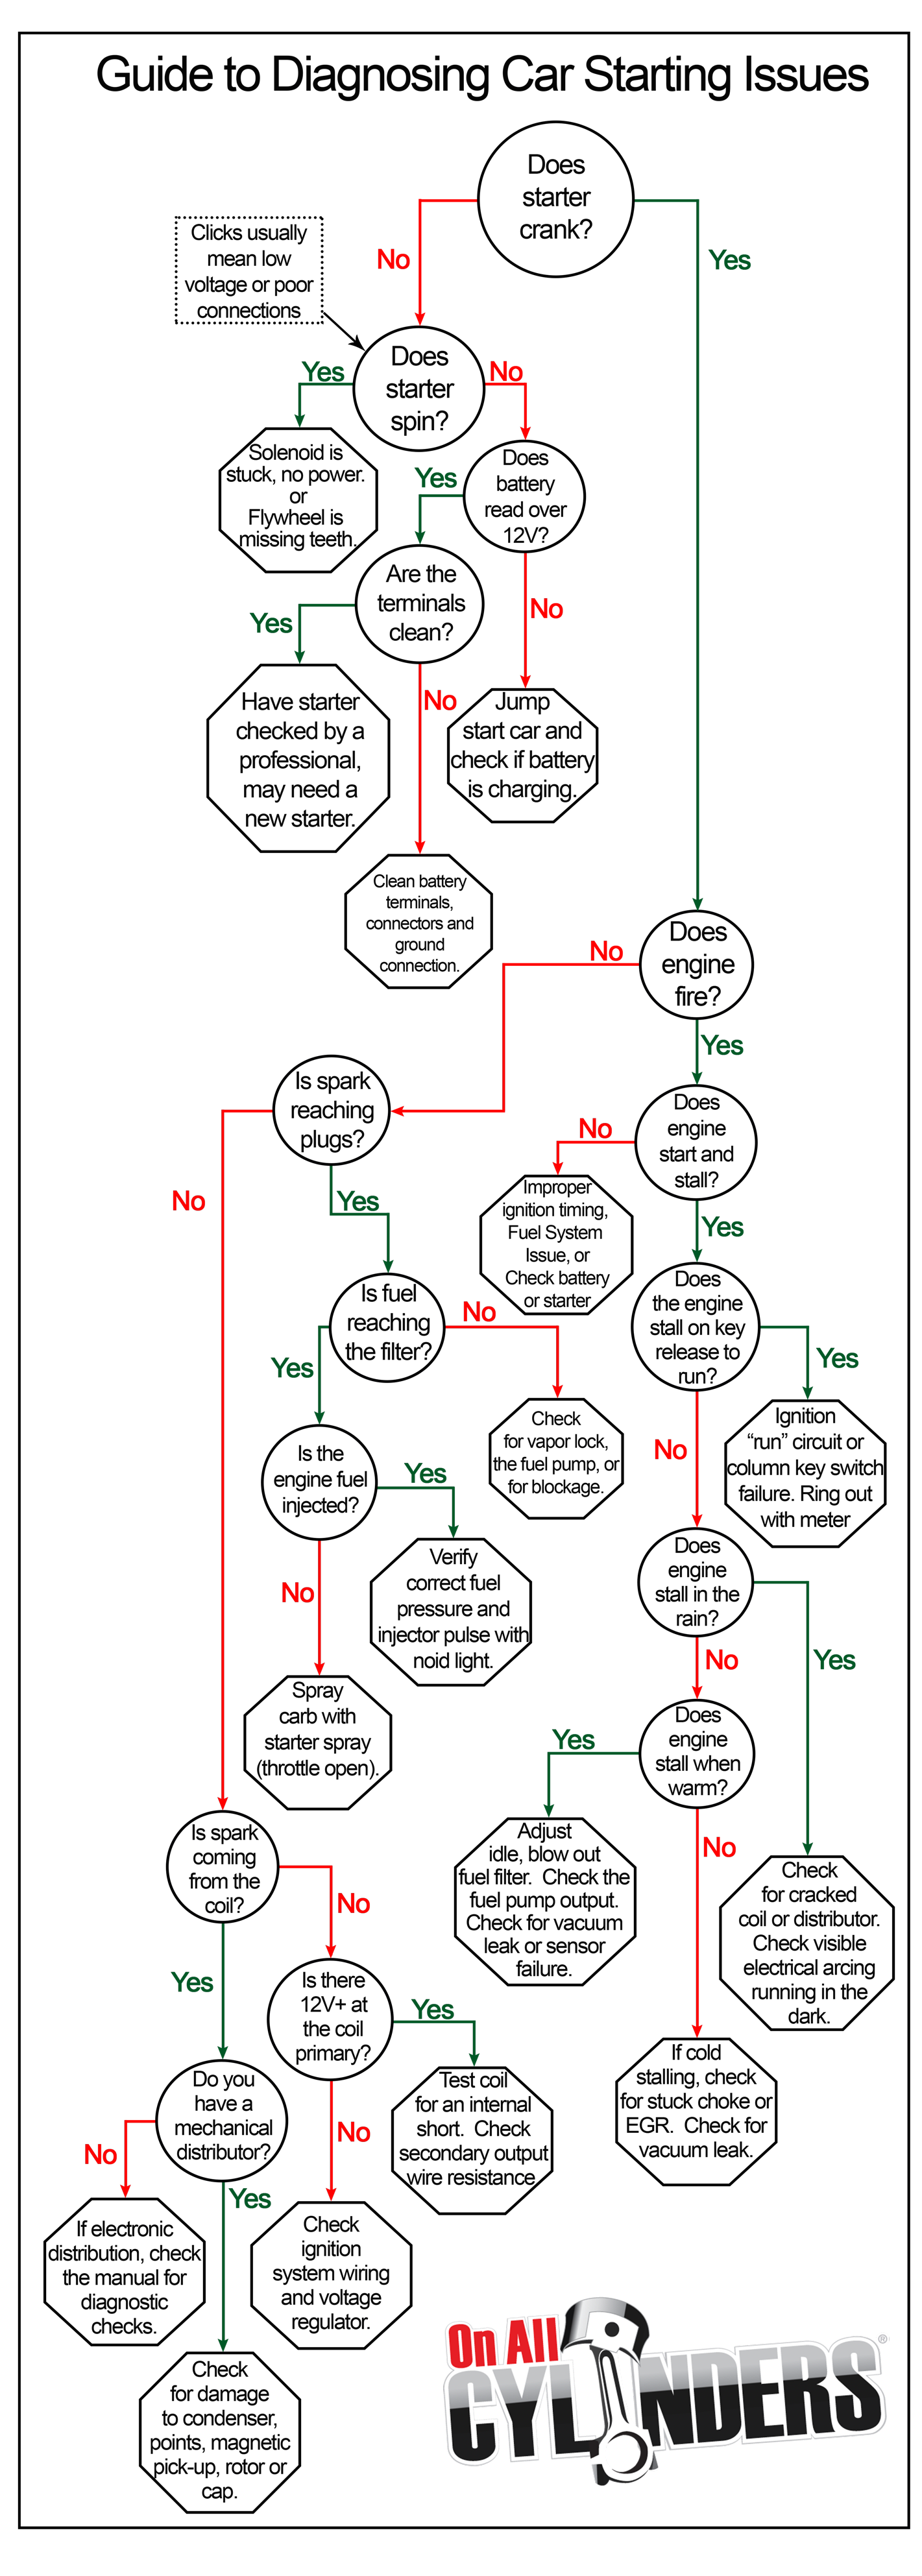
Even quality equipment encounters issues. These quick diagnostics solve 90% of jump-starting failures without professional help.
No Power from Jump Starter
- Check voltmeter reading—below 50% requires recharging
- Verify power button is pressed firmly
- Test USB port with phone—confirms unit functionality
- Inspect clamp cables for cuts or damage
Engine Won’t Crank
- Re-seat all connections—corrosion prevents good contact
- Try alternative ground point—move black clamp to different metal surface
- Clean battery terminals with wire brush if heavily corroded
- Allow 2-minute rest between attempts—prevents overheating
Weak or Intermittent Power
- Temperature factor—AGM batteries lose power in extreme cold
- Battery age—units over 3 years old may need replacement
- Vehicle requirements—diesel engines need more cranking power
Maintain Your Jump Starter for Reliability
Your NAPA jump starter requires minimal maintenance, but neglecting these basics guarantees failure when you need it most.
Storage Best Practices
- Recharge every 3-6 months when not in use
- Store above 50% charge—never let it drain completely
- Cool, dry location—avoid extreme temperatures in trunk or garage
- Keep clamps secured—prevents cable damage during transport
Quick Monthly Check
Take 30 seconds monthly to:
– Press power button and check voltmeter
– Wiggle clamps to ensure cable integrity
– Test LED work light functionality
– Verify USB port charges phone
Leverage All Features Beyond Jump Starting
Beyond jump-starting, your NAPA unit serves as emergency power for devices. These features work independently of the jump-starting function.
LED Work Light Operation
- Press light button for continuous illumination
- Position unit to light engine bay during nighttime jumps
- Battery conservation—light uses minimal power but turn off when not needed
USB Device Charging
- 3.1A output charges phones, tablets, and GPS units
- Works with jump starter ON or OFF
- Emergency power—fully charged unit can recharge smartphone 3-4 times
Conquer Winter Starting Challenges

AGM batteries outperform lithium alternatives in freezing temperatures, but cold still impacts performance. These strategies ensure reliable winter starting.
Pre-Cold Weather Prep
- Charge to 100% before winter storage
- Bring indoors during extreme cold—AGM performs better warm
- Test monthly—cold reduces battery capacity faster
- Keep in vehicle—trunk maintains warmer temperatures than truck bed
Cold Starting Technique
- Warm the unit by holding it indoors for 10 minutes if possible
- Double connection time—cold batteries need longer contact before starting
- Use shorter cranks—5-second bursts prevent motor overheating
- Plan for 2-3 attempts—cold batteries release energy more slowly
Your NAPA jump starter can provide years of reliable service with proper use and maintenance. Always check charge levels before long trips, store above 50% capacity, and follow the exact connection sequence every time. When your next dead battery strikes, you’ll be ready—not just with equipment, but with the knowledge to use it safely and effectively. Knowing how to use NAPA jump starter properly transforms a potential roadside disaster into a quick, safe recovery you can handle alone. Keep this guide in your glove compartment—you never know when you’ll need to use NAPA jump starter knowledge to get back on the road.


