
Your Black and Decker jump starter sat in the trunk all winter. Now the charger blinks red, the unit won’t hold power, and you’re stranded with a dead battery miles from help. This scenario plays out for hundreds of Black & Decker owners every season—especially with units 8+ years old. The good news: 90% of charging failures trace to just three fixable issues, and most repairs cost less than a replacement unit.
This guide walks you through the exact diagnostic steps, part numbers, and repair techniques used by service centers. You’ll learn to spot the difference between a dead battery, failed charger, and internal circuit fault—saving both time and money. If your Black and Decker jump starter not charging issue has you frustrated, these proven methods will get you back on the road fast.
Decode Your Black and Decker Charging Indicator Lights
Why Your Charger LED Stays Completely Dark
When plugging in your Black and Decker jump starter yields zero lights, the problem lies outside the unit itself. First verify your wall outlet works by testing another device—many homeowners unknowingly use GFCI outlets that have tripped. Next, wiggle the charger cable near both ends while watching for any LED flicker, which indicates internal wire damage. Most Black & Decker models use a standard 5.5×2.1mm barrel connector requiring 12V 1A output. Grab a universal replacement charger from an auto parts store for under $20 if yours shows signs of internal damage.
What Flashing Red Light Patterns Really Mean
That persistent red blinking isn’t random—it’s your Black and Decker unit screaming “I can’t charge this battery!” For SLA (sealed lead-acid) models, this typically means the battery has dropped below 12.0V, triggering the charger’s safety cutoff. In lithium-ion versions (like the popular 20V models), flashing indicates cells have fallen below 15V on a 20V nominal system. Critical note: This protection mechanism prevents dangerous charging of depleted cells but often gets misdiagnosed as a dead unit.
Solid Red Light That Never Turns Green Explained
Here’s the tricky scenario: your Black and Decker jump starter shows solid red while charging, voltage reads normal (12.6V+), yet the unit dies immediately when unplugged. This classic symptom means your sealed lead-acid battery has lost storage capacity—like a bucket with holes. The charger keeps filling it, but energy leaks faster than it stores. Units over 8 years old commonly exhibit this failure pattern despite working indicator lights.
Test Your Black and Decker Battery Voltage Like a Pro
Essential Multimeter Setup for Accurate Readings
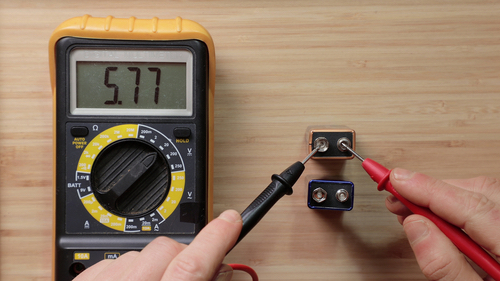
Grab a basic digital multimeter ($15 at hardware stores) and safety glasses before proceeding. Disconnect all cables from your jump starter first. For SLA models, locate the internal battery terminals (usually red/black wires under a removable panel). Lithium-ion units require more disassembly—only proceed if you’re comfortable with electronics. Set your multimeter to DC voltage mode and touch probes to the battery terminals, matching red to positive and black to negative.
Critical Voltage Thresholds That Determine Repair Path
- After 8-hour charge: Must read 12.6-13.2V for SLA or 16.4-16.8V for Li-ion
- After resting 1 hour: Shouldn’t drop more than 0.2V from initial reading
- Under load test: Connect a 12V bulb—voltage shouldn’t fall below 11.5V (SLA)
Readings below these thresholds indicate replacement needed. A 2003-era Black and Decker unit recently tested at 11.8V after charging—classic end-of-life symptoms despite working indicator lights. Pro tip: Always perform voltage checks after the unit has rested for one hour to avoid false high readings from surface charge.
Replace Your Black and Decker SLA Battery in 5 Steps
Find the Exact Battery Match for Your Model
Most Black and Decker jump starters use either 7Ah or 9Ah sealed lead-acid batteries. Measure your existing battery—7Ah units typically measure 151×65×94mm while 9Ah are slightly larger. Cross-reference part numbers UB1270 (7Ah) or UB1290 (9Ah), both available for $18-28 online with F2 quick-connect tabs. Warning: Installing the wrong size battery can damage your unit’s internal components.
Complete SLA Battery Replacement Procedure
- Remove four Phillips screws from the bottom panel while keeping track of screw lengths
- Carefully disconnect red (+) and black (-) spade connectors—note their positions
- Lift out old battery (may have adhesive strips—use plastic pry tool to avoid damage)
- Install new battery maintaining original polarity (red to red, black to black)
- Reassemble and charge overnight before attempting a jump start
Pro tip: Take photos during disassembly. Some models route cables under plastic channels that must be recreated exactly to avoid pinching wires.
Fix Black and Decker Lithium-Ion Undervoltage Lockout Now
Emergency Bump Charge Recovery Method That Works
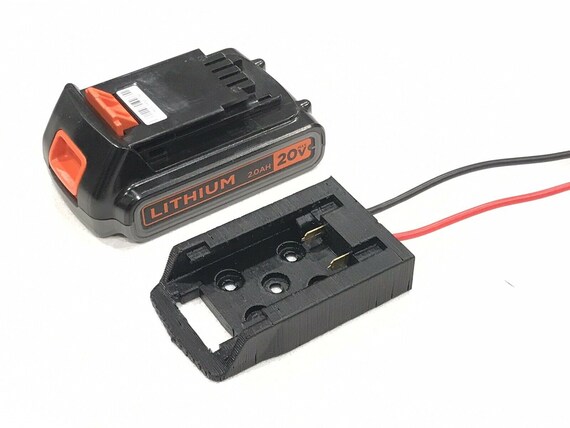
When your lithium-ion jump starter drops below 15V, the protection circuit prevents charging—a common reason why your Black and Decker jump starter not charging issue persists. Here’s the field-tested recovery:
- Borrow a working Black and Decker 20V battery
- Connect positive-to-positive and negative-to-negative with jumper wires for 30-60 seconds
- Immediately place the “dead” pack on its charger
- LED should turn solid red, then green when full
This works because the good battery provides enough voltage to reset the protection circuit. Critical safety note: Limit attempts to twice—if cells read below 2.5V individually, replacement is safer than risking fire.
When to Attempt Cell-Level Balancing (Advanced Only)
Disassemble the pack using Torx T10 screws to access individual 18650 cells. Measure each cell—variance over 0.2V indicates imbalance. Use a single-cell charger at 4.2V/500mA to top off low cells. Warning: This requires spot-welding equipment to rebuild safely—consider replacement packs at $45 aftermarket versus $79 OEM if you’re not experienced with battery repair.
Diagnose Black and Decker Charger and Cable Failures
Test Charger Output Voltage Correctly
Unplug the charger from your jump starter. Set your multimeter to DC volts and test the barrel connector. SLA chargers should read 12V±0.5V while Li-ion units need 20V±1V. Any reading outside this range means the charger failed—not the jump starter. Pro tip: Test multiple wall outlets to rule out voltage fluctuations causing inconsistent readings.
Find Hidden Cable Breaks With Flex Testing
Flex the cable while testing continuity—intermittent readings indicate internal wire breaks most common within 2 inches of the strain relief. Replacement chargers cost $19 from Black & Decker, or universal 12V 1A adapters work if voltage matches. Warning: Never attempt to splice damaged charger cables—this creates fire hazards and voids safety certifications.
Prevent Future Black and Decker Charging Failures
Optimal Storage Practices for Longevity
- SLA models: Maintain 12.4V during storage (about 75% charged)
- Li-ion: Store at 60% charge (≈19V on 20V packs)
- Climate control: Never charge below 32°F or above 104°F
- Recharge schedule: Top off every 90 days regardless of use
Loosely coil cables—tight wraps break internal wires over time. Apply dielectric grease to clamps after winter use to prevent corrosion that increases resistance and charging time. Expect 200 charge cycles from SLA batteries, 500 from lithium-ion before noticeable capacity loss.
When to Replace Your Black and Decker Jump Starter
Cost Comparison That Saves You Money
- SLA battery replacement: $18-28 (7-9Ah)
- Li-ion pack replacement: $45-89 (aftermarket vs OEM)
- New jump starter equivalent: $80-150
For units over 8 years old with multiple issues (cracked case, corroded terminals, failing compressor), replacement often makes sense. A customer’s 2003 unit recently faced $79 OEM battery plus $19 charger—total approaching new unit cost. Critical factor: Check if your specific model’s parts are still available—many older Black and Decker units now face discontinued components.
Black and Decker Jump Starter Not Charging Decision Flowchart
Jump starter not charging

├─ Charger LED OFF → Test outlet first, then replace cable/charger

├─ LED flashing → Check battery voltage

│   ├─ <12V SLA or <15V Li-ion → Replace battery or bump-charge

│   └─ Higher voltage → Check internal fuse/protection board

├─ LED solid but won't hold charge → Battery replacement needed

└─ Charges but no jump power → Battery end-of-life confirmed
Most owners solve their Black and Decker jump starter not charging issues within 30 minutes using these steps. The key is systematic testing—eliminate external factors first, then move to battery replacement before considering complex repairs. With parts readily available and total repair costs under $30 for most SLA models, there’s no reason to stay stranded. Keep this guide in your glove compartment—you’ll be glad you did when winter strikes again.


