
Your Dewalt jump starter worked perfectly last winter, but now it’s dead when you need it most. Whether you’re facing a completely unresponsive unit or one that just clicks without cranking, these failures always happen at the worst possible moment. This guide walks you through proven diagnostic steps and fixes that can save your morning—and potentially hundreds in replacement costs. If your Dewalt jump starter not working issue is leaving you stranded, these targeted solutions will get you back on the road faster than waiting for roadside assistance.
Identify Your Specific Dewalt Jump Starter Failure Pattern
Complete Power Failure Troubleshooting
When your Dewalt jump starter shows zero signs of life—no LEDs, no sounds, no charging indication—your first step is determining if this is a deep discharge or catastrophic failure. Lithium-ion batteries can suffer permanent damage when discharged below 2.5V per cell, triggering protection circuits that prevent operation. Connect your unit to its wall charger and wait 30 minutes before checking for any LED response. If nothing happens, try an alternative 14.8V charger with matching amperage (1.5-2A). Some deeply discharged units require 8-12 hours of trickle charging before showing any signs of life.
Critical warning: If the unit becomes warm during charging attempts, stop immediately—this indicates internal damage requiring professional attention. Never attempt to jump-start from another power source, as this can cause permanent damage to the battery management system.
Partial Functionality Diagnostic Path
Your DXAEJ14 might power USB devices perfectly while showing 75% charge, yet fail completely when attempting to jump-start a vehicle. This frustrating pattern typically indicates battery degradation or cell imbalance where individual cells within the pack have developed different charge levels. The weakest cell triggers voltage cut-off during high-current demands, even when the overall charge indicator appears healthy. Test this by fully charging your unit, then attempting to start progressively smaller engines—if it works on a motorcycle but fails on a compact car, capacity degradation is almost certainly the culprit.
Decode Dewalt-Specific Error Code Patterns
F01 Reverse Polarity Error Resolution
When your Dewalt jump starter displays F01 but clamps are properly connected, this usually indicates a malfunctioning protection circuit rather than user error. Start by inspecting clamp jaws for corrosion or debris that might create false polarity detection. Clean terminals with a wire brush and isopropyl alcohol, then reconnect with firm pressure. If the error persists after multiple attempts with verified correct connections, perform a master reset by holding the power button for 30+ seconds while connected to the charger. This often resets the internal microprocessor causing false error triggering.
F03 Low Voltage Error Recovery
F03 errors occur when battery voltage drops below safe levels during cranking attempts, often due to severely degraded cells or imbalanced packs. Unlike simple low-charge warnings, this indicates your lithium-ion cells have lost significant capacity. First, fully recharge your unit using the original Dewalt charger—third-party chargers may not provide proper voltage regulation. If F03 persists after multiple full charges, your battery likely needs replacement. Units showing this error after less than 2 years of normal use may qualify for warranty coverage.
Execute 5-Minute Diagnostic Checklist
Cable and Connection Verification Protocol
Loose connections cause 90% of apparent jump starter failures. Start your dewalt jump starter not working diagnosis with this critical inspection:
- Check cables for internal breaks from repeated flexing
- Verify clamp jaws close firmly with good spring tension
- Examine terminals for green corrosion that creates high resistance
- Inspect case for cracks near cable entries indicating internal damage
A simple multimeter test confirms connection quality: measure resistance between clamp tips—it should read less than 0.1 ohms. Higher readings indicate failing cables that need immediate replacement.
Button Response and Display Test
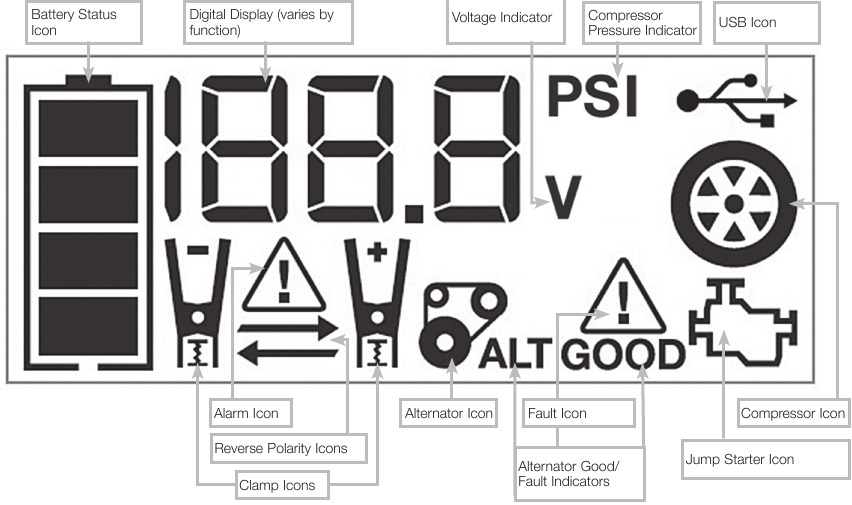
Press and hold your Dewalt’s power button for 5+ seconds. A functioning unit should illuminate all LEDs in sequence, even if too depleted for jump-starting. If only some LEDs respond or nothing happens, internal connections may be failing. Test USB ports simultaneously—functional USB outlets with non-responsive jump-start capability indicate BMS (Battery Management System) issues rather than complete battery failure. Units with digital displays (DXAEPS14 and DJS140 models) should cycle through battery health information when powered on; failure to do so suggests display circuit problems.
Implement Proven Recovery Procedures
Deep Discharge Recovery Protocol
For completely dead Dewalt units showing no LED activity, follow this specialized recovery process:
- Connect to a 2A charger (not the standard 1.5A) for proper voltage regulation
- Leave connected for minimum 8 hours regardless of apparent lack of response
- Check every 2 hours—discontinue immediately if unit becomes warm
- After 8 hours, attempt power-on sequence by holding button for 5+ seconds
This extended trickle charging often revives units suffering from deep discharge protection lockout. Avoid using automotive chargers or higher-amperage power sources, as these can damage the sensitive BMS circuitry.
Cell Balance Recalibration Method
Some Dewalt models allow balance charging through hidden menu sequences that recalibrate cell monitoring circuits. For DXAEPS14 and newer DJS140 units with digital displays:
- Power on unit while holding both “+” and “-” buttons
- Look for alternating LED pattern indicating balance mode activation
- Leave connected to charger for 4-6 hours without interruption
- Verify improved performance with subsequent jump-start attempts
Pro tip: This technique only works on units with functional BMS systems—don’t attempt if your unit shows F03 errors persistently after multiple full charges.
Perform Targeted Component Replacement

Cable Assembly Replacement Guide
Dewalt offers replacement cable sets for all models, and installation requires basic technical skills:
- Use Phillips head screwdriver to access internal connections
- Carefully desolder old cable assembly while noting polarity
- Match wire gauge exactly—using thicker wire can overtax internal circuits
- Apply heat shrink tubing to all connections before reassembly
- Test with multimeter before closing case to verify proper continuity
This $25 repair can restore full functionality to units otherwise deemed dead, especially for models under 3 years old where battery health remains good.
Battery Pack Replacement Strategy
Third-party lithium packs cost $40-60 versus $150+ for new units, but require careful selection:
- Confirm 14.8V nominal voltage (4-cell series configuration)
- Verify minimum 8000mAh capacity for adequate cranking power
- Match BMS connector type exactly to prevent communication errors
- Double-check polarity before final connection—reverse connection destroys BMS
Critical warning: Never attempt battery replacement on units still under warranty—this immediately voids coverage. For out-of-warranty units, professional battery rebuild services provide better performance than original at lower cost, typically $60-80.
Prevent Future Dewalt Jump Starter Failures
Optimal Storage Protocol
Never store your jump starter fully charged or completely dead—this accelerates battery degradation. Maintain 40-80% charge for long-term storage and check monthly. Recharge immediately if level drops below 50%, as lithium-ion batteries suffer permanent damage when left in deep discharge state. Store in a cool, dry location away from direct sunlight and extreme temperatures.
Usage Best Practices
After every jump start attempt, immediately recharge regardless of indicated level—deep discharges significantly reduce battery lifespan. Limit continuous cranking to 15-second bursts with 2-minute rest periods between attempts to prevent overheating. Test your unit monthly by connecting to a known-good vehicle battery to verify proper clamp connection and LED response, keeping circuits active and identifying problems before emergencies.
Warranty Claim Success Strategy
Document Failure Symptoms Properly
Your 3-year Dewalt warranty covers manufacturing defects but requires specific documentation. Record these critical details before contacting support:
- Serial number (located inside battery compartment)
- Exact error codes displayed with frequency of occurrence
- Vehicle types successfully started versus those that failed
- Timeline of performance degradation
Units showing capacity below 50% with normal use within 2 years of purchase typically qualify for replacement under pro-rated warranty. Deep discharge damage from user error or water exposure voids warranty regardless of age.
Contact Dewalt Service Effectively
Call 1-800-4-DEWALT (1-800-433-9258) Monday-Friday 8AM-6PM EST with documentation ready. Mention specific model numbers (DXAEJ14, DXAEPS14, or DJS140) and error codes observed. Most warranty claims are resolved within 2-3 weeks, with Dewalt typically replacing the entire unit rather than performing component-level repairs.
When your Dewalt jump starter not working issue strikes, remember that most “dead” units simply need proper charging or reset procedures. Start with the quick diagnostics—90% of failures stem from connection issues or deep discharge states rather than catastrophic component failure. For units beyond 3 years old, weigh professional battery rebuilding costs against new unit prices, especially for high-capacity models. Implement the monthly testing routine to catch problems early, and store your jump starter at optimal charge levels to maximize lifespan. With proper maintenance, your Dewalt jump starter can provide reliable emergency power for years beyond the warranty period.


