
Your tractor won’t start, the lights are dim, and standard jump starting from the battery isn’t working. When your ignition system fails but the starter motor itself is functional, you need to bypass everything and send power directly to the starter. This emergency procedure gets your tractor running when traditional methods fail—whether you’re stuck in a field at dawn or trying to finish plowing before rain hits. In this guide, you’ll learn exactly how to jump start a tractor from the starter safely, identify why standard jump starts fail, and troubleshoot common problems preventing your tractor from starting.
Why Standard Jump Starts Fail on Tractors
Ignition Circuit Failures That Block Normal Starting
When you turn the key but hear nothing—not even a click—your ignition circuit has likely failed. Standard jump starting won’t work because the problem isn’t your battery’s charge level but rather broken connections in the control circuit. Common failure points include corroded safety interlock switches under your seat, damaged wiring harnesses near the transmission, or a faulty ignition switch that won’t send the signal to engage the starter solenoid.
When Direct Starter Activation Is Your Only Option
You need this emergency bypass when:
– Your battery shows adequate voltage but the starter won’t engage
– You hear no clicking sound when turning the key
– Traditional jump starting from another vehicle fails repeatedly
– You’ve confirmed battery terminals are clean but still get no response
Critical warning: Never attempt this method if you hear rapid clicking—that indicates a weak battery needing proper charging, not a control circuit failure.
Essential Safety Steps Before Starter Bypass
Tractor Positioning Checklist
Park your tractor on level ground with the parking brake firmly engaged. Shift the transmission into neutral and disengage the PTO completely. Chock both rear wheels with solid blocks—even on flat ground, tractors can roll unexpectedly when the starter engages. Work in a well-ventilated area away from flammable materials, and keep bystanders at least 20 feet away during the procedure.
Personal Protection Must-Haves
Remove all jewelry and wear safety glasses rated for impact protection. Use insulated gloves rated for electrical work (minimum 1000V protection). Keep a Class ABC fire extinguisher within immediate reach—starter motors can spark intensely during bypass. Ensure your clothing fits snugly to prevent getting caught in moving parts if the engine starts unexpectedly.
Equipment Checklist for Starter Jump Starting
You’ll need these specific items:
– Heavy-duty jumper cables rated for 400+ amps (standard automotive cables often fail)
– Fully charged power source (don’t use a weak battery—minimum 12.4V for 12V systems)
– Insulated screwdriver with 6-8 inch shaft (never use metal tools without insulation)
– Wire brush for cleaning corroded connections
– Multimeter to verify power sources
– Your tractor’s service manual for terminal identification
Locating Your Starter Components Quickly

Finding the Starter Motor on Common Tractor Types
For most compact tractors (under 50 HP):
– Kubota, John Deere, Yanmar: Starter mounts on the left side near the transmission
– Massey Ferguson, New Holland: Typically on the right side near the engine block
– Large agricultural tractors: Check near the flywheel housing at the engine’s base
Look for a cylindrical component about 3 inches in diameter with thick cables attached—this is your starter solenoid. On newer models, it may be hidden under protective covers requiring a 10mm socket to access.
Solenoid Bypass Method: Step-by-Step Guide
Step 1: Clean and Verify Connections
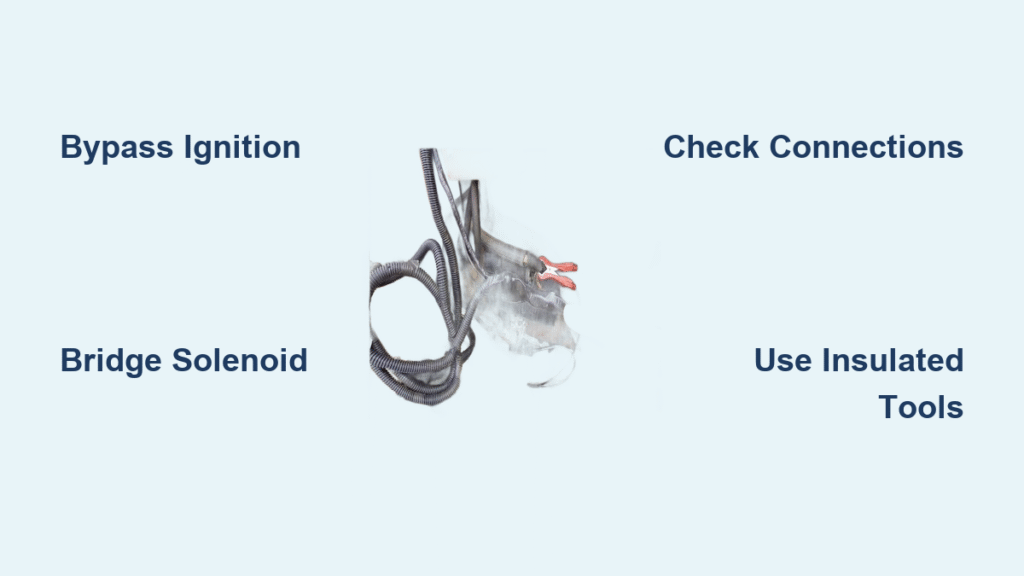
Use your wire brush to clean both large terminals on the solenoid until bare metal shows. Check battery voltage with your multimeter—12.6V minimum for 12V systems. If below 12.4V, charge your auxiliary power source before proceeding. Clean corrosion from all terminal surfaces, as even minor buildup prevents proper current flow during bypass.
Step 2: Identify Critical Power Terminals
Locate the battery cable terminal (thick red cable running directly from battery positive) and the starter motor terminal (thick cable leading to the starter housing). These are the two large terminals you’ll bridge—ignore the smaller control wires during bypass.
Step 3: Bridge Terminals Safely
Hold your insulated screwdriver by the plastic handle only. Position the metal shaft across both large terminals simultaneously. Expect significant sparking—this is normal. Maintain contact for 1-2 seconds to crank the engine. If the engine doesn’t start, wait 30 seconds between attempts to prevent starter overheating.
Step 4: Engine Start Verification
If the engine fires, immediately remove the screwdriver. Let the engine run for 15-20 minutes to recharge your battery. Check your charging system voltage—it should read 13.8-14.4V while running. If below 13.5V, your alternator needs attention.
Direct Starter Jump for Integrated Solenoids

When to Use This Alternative Method
Choose this approach when your solenoid is built into the starter housing (common on newer Kubota and John Deere models) or when the solenoid itself has failed. This method sends power directly to the starter motor, bypassing all control components.
Connection Sequence for Success
- Disconnect the negative cable from your tractor battery
- Connect positive jumper cable from your power source to the starter motor’s main terminal
- Connect negative jumper cable to a clean, unpainted engine block surface (not the battery negative)
- Momentarily touch the positive cable to the starter terminal—hold for no more than 2 seconds
- Immediately disconnect after engine starts to prevent electrical damage
Troubleshooting Failed Jump Start Attempts
Why Your Starter Won’t Crank (With Fixes)
- Sparks but no crank: Loose ground connection—check engine block contact point
- Single loud click: Seized starter motor—tap lightly with hammer while attempting bypass
- Smoke or burning smell: Immediately stop—cable mismatch or short circuit
- Slow cranking: Inadequate power source—use larger jump pack or vehicle
Quick Power Source Verification
Test your auxiliary battery voltage:
– 12V systems: Must read 12.6V+ (12.4V is insufficient for starter bypass)
– 24V systems: Requires 25.2V+ for reliable cranking
– Jump packs: Verify capacity—minimum 1000 peak amps for tractors
Model-Specific Jump Starting Tips
Older Mechanical Tractors (Pre-1990)
These simpler systems often allow starter engagement in gear—never attempt this without chocking wheels securely. Some vintage tractors use 6-volt systems requiring special attention to cable sizing. Positive-ground models (rare) need reversed jumper connections—consult your manual before proceeding.
Modern Electronic Tractors (Post-2000)
Newer models may have ECU-controlled starters preventing direct bypass. Check for immobilizer lights on the dashboard—if illuminated, bypass won’t work. Diagnostic trouble codes often trigger after successful jump starts—have your dealer clear these before operating implements.
Diesel Engine Critical Considerations
Diesel tractors need significantly more cranking power due to high compression. Ensure your power source has double the capacity of what you’d use for a gasoline engine. Glow plug circuits must activate for cold starts—listen for the glow plug indicator light cycle. Fuel shutoff solenoids require power to stay open—engine may die immediately if this circuit is faulty.
Post-Jump Start Critical Actions
Immediate Checks After Starting
Let the engine run for 15-20 minutes before shutting down. Test all electrical systems—PTO engagement, three-point hitch, and lights. Check for burning smells indicating damaged wiring. Inspect the starter area for excessive heat—if too hot to touch, stop and investigate.
Battery Health Assessment
Perform a load test on your battery—replace if it can’t maintain 9.6V under load for 15 seconds. Check electrolyte levels in flooded batteries—top up with distilled water if plates are exposed. For sealed batteries, test specific gravity through the built-in indicator (green = good).
When to Call a Professional
Seek help immediately when:
– You smell electrical burning during attempts
– Starter shows visible damage or oil contamination
– Multiple successful starts still result in no-charge condition
– Your tractor has complex electronics like CAN bus systems
– You lack proper insulated tools for safe operation
Prevent Future Starting Failures
Emergency-Proof Your Tractor
- Keep dielectric grease on all electrical connections to prevent corrosion
- Install a battery disconnect switch for quick isolation during storage
- Carry a portable lithium jump pack rated for 2000+ peak amps
- Check safety interlock switches monthly by wiggling seat and pedals
Direct starter jump starting gets your tractor running when ignition systems fail, but it’s strictly an emergency procedure. Once operational, schedule proper diagnosis of the underlying issue—typically a failed safety switch or corroded wiring harness. Regular maintenance of your starting system prevents 90% of field breakdowns, saving you from future jump start emergencies when you’re halfway through planting season.
Final note: Always consult your tractor’s service manual before attempting electrical work—manufacturer-specific procedures vary significantly between brands and model years.


