

You’re miles from civilization as dusk settles, your motorcycle silent despite repeated starter button pushes. No helpful riders pass by, and your phone signal flickers weakly. That compact jump box in your saddlebag could be your ticket home—if you know exactly how to use it correctly. Unlike risky car-to-motorcycle jumps that threaten sensitive electronics, a proper jump box delivers controlled power in a package smaller than your wallet. This guide reveals the precise sequence to revive your bike in under five minutes while avoiding costly mistakes that could leave you stranded or damage your electrical system.
Most riders don’t realize modern lithium jump boxes as light as 1 pound easily crank large touring bikes when used correctly. But connecting clamps in the wrong order or leaving the unit powered after starting can fry regulators or melt wiring. By the end of this guide, you’ll master the exact connection sequence, recognize when a jump box won’t solve your problem, and implement battery maintenance that prevents future roadside emergencies. Let’s turn panic into confidence with the only method that protects your motorcycle’s delicate electronics.
Why Your Motorcycle Battery Dies and When a Jump Box Actually Works
Left heated grips on overnight? That’s the #1 reason riders get stranded with a dead battery. Modern bikes draw significant parasitic drain from GPS units, Bluetooth systems, and security features—even when parked. A jump box solves this instantly by delivering concentrated 12V power without overwhelming your bike’s electronics like a car battery would.
Left Lights On Overnight? The Most Common Stranding Cause
Heated gear left plugged in, GPS units forgotten in accessory mode, or even a faulty alarm system can drain your battery to 11.8V overnight—enough to kill cranking power but not damage the cell. Your jump box’s 200-400 cranking amps provide exactly what your starter needs without risking the 800+ amps from an automotive battery that could fry voltage regulators. If your headlights were bright before shutdown but now won’t illuminate, this is almost certainly your fix.
When a Jump Box Won’t Fix Your No-Start Problem
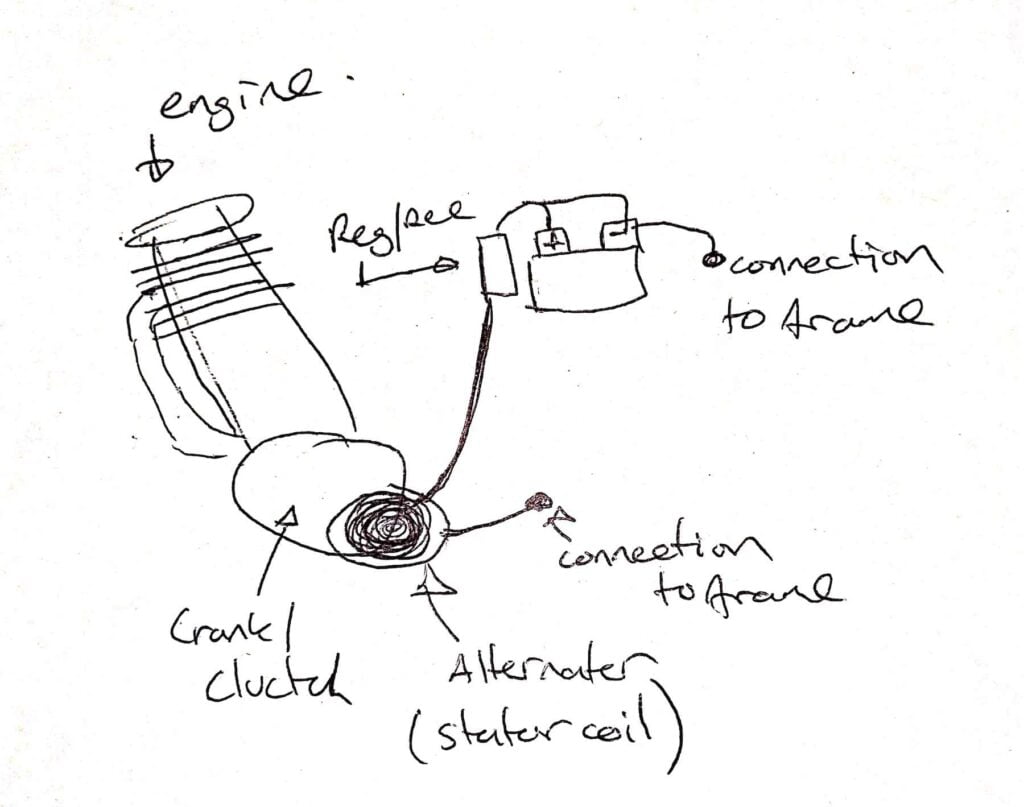
Swollen battery cases or white crust around terminals indicate internal failure—no jump box can revive these. Similarly, if your bike dies immediately after disconnecting the jump box, your stator or regulator/rectifier has failed. Verify by checking voltage at 3,000 RPM: below 13.8V means your charging system needs repair, not another jump. Never attempt a jump with cracked battery cases or sulfur smells—these require immediate replacement to avoid fire hazards.
5-Second Battery Health Check Before Using Your Jump Box
Don’t waste precious daylight pulling out cables when your problem might be simpler. These checks take less than half a minute but prevent unnecessary jump attempts.
How to Confirm It’s the Battery (Not the Fuel System)
Flip your kill switch to RUN and press the starter. If you hear rapid clicking but no engine turnover, your battery is critically low. Confirm by turning on headlights—dim or absent light confirms battery issues, while bright lights point to fuel or ignition problems. Wiggle battery terminals firmly; loose connections cause 30% of “dead battery” scenarios. If your neutral light won’t illuminate with the side stand up, check that safety switch first.
Red Flags That Mean Replace, Not Jump
Remove your seat and inspect the battery case. If sides bulge outward like a puffed chip bag or you detect rotten egg odors, internal damage has occurred. White crystalline deposits around terminals indicate acid leakage—clean these with a baking soda paste before proceeding, but replace the battery if corrosion penetrates the case. Never jump a battery showing these signs; the risk of explosion outweighs temporary revival.
Choosing the Right Jump Box for Your Motorcycle (12V Only)

Many riders buy oversized automotive jump boxes that endanger their bike’s electronics. Your motorcycle needs surprisingly little power—most starters draw just 100-200 amps during cranking.
Minimum Specs: Why 200 Cranking Amps Is Enough
Forget automotive-grade 1000A units. For any motorcycle under 1800cc, a compact lithium jump box with 200+ cranking amps (CA) suffices. Verify it has 12V output—never use 24V settings. Critical safety features include spark-proof clamps (prevents ignition near battery gases) and reverse polarity protection (alerts if clamps attach backward). Top models like the NOCO Boost Plus GB40 weigh just 2.4 pounds yet start bikes up to 900cc.
Pre-Use Checklist: Avoiding Dead Jump Boxes
Check your unit’s charge indicator before emergencies strike. Below 75% capacity risks insufficient cranking power in cold weather. Inspect clamp teeth—they must bite through terminal corrosion. Frayed cables or melted insulation near clamps require immediate replacement. Store your jump box charged between 20-80% capacity; full discharges degrade lithium cells permanently. Recharge every 3 months even if unused.
Connecting Your Jump Box: The Safe Order That Prevents Sparks

One wrong connection sequence risks explosive hydrogen gas ignition. Batteries emit flammable vapors during normal operation, making spark prevention non-negotiable.
Why Grounding to the Frame Beats the Negative Terminal
Attaching the black clamp directly to the battery’s negative terminal creates spark risk near vent caps where hydrogen concentrates. Always connect black to an unpainted engine bolt or frame bracket at least 12 inches from the battery—this grounds the circuit safely away from gas emissions. Ideal spots include cylinder head bolts or frame mounting points. Ensure metal is bare and clean; paint or rust creates poor contact.
Step-by-Step Connection Sequence (With Visual Cues)
- Power OFF jump box completely (no indicator lights)
- Red clamp to battery positive (+): Press firmly until teeth grip metal
- Black clamp to engine/frame ground: Listen for solid click on metal
- Verify both clamps won’t slip—tug gently on cables
- Power ON jump box—wait for green “ready” light
- Crank 2-3 seconds max—engine should fire within first attempt
- Immediately power OFF jump box once running
- Remove black clamp first, then red
Visual cue: If clamps spark during connection, power OFF immediately and recheck polarity.
Cranking Your Motorcycle: Short Bursts Only
Continuous cranking melts windings and drains jump boxes faster than necessary. Precision timing protects both systems.
How Long to Hold the Starter Button
Limit cranking to 3-second bursts—the exact time it takes most bikes to fire. Longer strains your starter motor and jump box. If no ignition occurs, wait 30 seconds between attempts to cool both systems. During pauses, check clamp connections; loose grips cause voltage drop. If the engine turns over slowly despite good connections, your jump box may be low—recharge it before further attempts.
What to Do If the Engine Doesn’t Fire Immediately
After two failed bursts, verify fuel delivery: prime the system by turning the key to ON (without cranking) for 5 seconds. Check for fuel pump whine. If still dead, your issue isn’t battery-related—suspect fuel cutoff valves or fouled plugs. Never exceed three cranking attempts; repeated failures indicate deeper problems requiring professional diagnosis.
Riding After a Jump Start: How to Properly Recharge Your Battery
Your battery isn’t charged yet—it’s merely awakened. Riding incorrectly after a jump causes repeat failures within days.
Minimum Ride Time and RPM for Battery Recovery
Ride continuously for 20-30 minutes at highway speeds (3,000-5,000 RPM). Idling or stop-and-go traffic won’t sufficiently recharge the battery—alternator output plummets below 2,500 RPM. Maintain steady throttle; frequent deceleration cuts charging current. Avoid using heated gear or phone chargers during this ride to maximize power directed to the battery.
Verifying Your Charging System Works Post-Jump
After riding, let the bike rest 30 minutes. Test voltage at the battery:
– Engine off: Should read 12.6V+ (indicates full charge)
– Engine at 3,000 RPM: Must show 13.8-14.7V
Lower readings mean your stator or regulator failed—schedule immediate service. If voltage tests pass but the bike won’t restart after sitting, your battery has permanent damage and needs replacement.
Avoiding Next Time: Your Motorcycle Battery Winter Storage Guide
Preventative maintenance beats roadside emergencies. Implement these protocols to avoid jump starts entirely.
Smart Tenders vs. Monthly Charging
Connect a motorcycle-specific smart tender (like Battery Tender Jr.) whenever storing your bike over 7 days. These automatically switch to float mode at 13.6V, preventing overcharging. Never use automotive chargers—they deliver excessive voltage that cooks AGM batteries. If no tender is available, manually charge monthly to 12.8V using a 1-2A motorcycle charger.
Why Concrete Floors Kill Stored Batteries
Contrary to myth, modern sealed batteries don’t discharge faster on concrete—but temperature swings do. Store batteries in climate-controlled spaces above 50°F. Place on wood shelves (never bare floors) and check voltage every 4 weeks. Recharge when voltage drops to 12.4V. Apply dielectric grease to terminals before storage to prevent corrosion.
5 Costly Jump Box Errors That Fry Your Motorcycle Electronics
These mistakes cause permanent damage that turns a $50 jump into a $500 repair bill.
Leaving the Jump Box On After Engine Start
Continued connection after startup allows reverse current flow through your regulator. This overheats diodes and melts internal components. Always power OFF the jump box the moment the engine catches. If your bike stalls immediately after disconnecting, this is likely why—the regulator is already damaged.
The Danger of Continuous Cranking
Holding the starter button beyond 5 seconds overheats windings and jump box circuits. Most units shut down from thermal protection after two long cranks, leaving you stranded. If the engine doesn’t fire in three 3-second bursts, diagnose fuel or ignition—not battery. Wait 5 minutes before retrying to cool systems.
Final Tip: Keep a printed jump sequence card in your tank bag. When roadside stress hits, muscle memory fades—but having “Red to +, Black to Frame, Power ON Last” visible prevents fatal errors. Pair this with monthly voltage checks, and you’ll never face a preventable stranding again. Your jump box isn’t just emergency gear—it’s your confidence to ride farther, knowing you control the solution when batteries fail.


