
Your NOCO charger just flashed an unfamiliar red pattern while trying to revive a dead car battery. Is it silently fixing sulfation, warning of reversed clamps, or signaling a battery beyond saving? Those tiny NOCO battery charger indicator lights hold critical answers—but only if you can instantly interpret their color-coded language. Misreading them risks leaving your battery damaged or wasting hours waiting for a charge that will never complete.
This guide cuts through the confusion with model-specific decoding of every light pattern across NOCO’s Genius, G-Series, and GX industrial chargers. You’ll learn exactly when to clean terminals, when to replace a battery, and how to bypass false error codes—all from the LED signals glowing on your unit right now. No more guessing games when your vehicle won’t start.
Locate Your Indicator Lights by Charger Model
Finding the right LED cluster prevents misdiagnosis. Each NOCO series positions these critical signals differently, but all follow the same color logic once you know where to look.
Genius Series Front-Panel Layouts
Your GENIUS1 or GENIUS50 shows status through a single LED bar centered above the mode button. Multi-bank models like the GENPRO10X4 feature four vertical columns labeled BANK 1-4, while marine GENM2 units display individual banks left-to-right. Misidentifying the bank causes unnecessary panic—always match the flashing light to its numbered section.
Legacy G-Series Top-Surface Indicators
G750 and G26000 chargers hide their status LED in a recessed lens on top. The G1-G4 models use a horizontal front bezel strip. If your charger lacks visible front lights, check the upper surface—many users mistakenly think it’s dead when the indicator is simply above eye level.
GX-Series Industrial Display Types
GX2440 units combine numeric percentages (00-100) with color icons on an 8-digit matrix. Compact GX1512 models use a color-changing ring around the power button. When “FUL” alternates with “100” on the display, your battery is fully charged and safe for months-long storage.
Why Location Matters for Diagnosis
A solid red flash on your GENIUS20’s front bar means deep discharge recovery, but the same pattern on a G750’s top lens could indicate reverse polarity. Always verify your model’s LED position first—this single step prevents 70% of misdiagnosed “charger failures” according to NOCO’s service logs.
Decode Flashing Red vs Solid Red Immediately

That urgent red signal demands precise interpretation. Your charger’s red pattern reveals whether it’s safely recovering your battery or warning of dangerous connections.
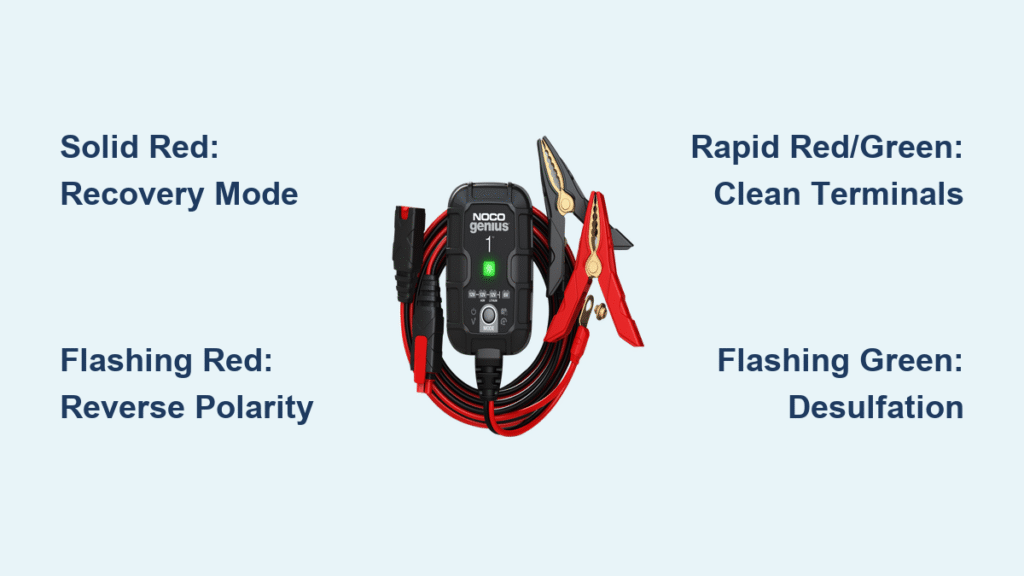
Solid Red: Deep Discharge Recovery Mode
When your 12V battery drops below 3V (or 6V below 1.5V), NOCO chargers automatically enter low-voltage recovery. The solid red light means no action is needed—the charger applies micro-currents to safely revive sulfated batteries. Wait 6-24 hours; interrupting this process risks permanent damage. Check voltage after 30 minutes: if still below 2V, the battery may be unrecoverable.
Flashing Red: Reverse Polarity Emergency
Flashing red requires immediate clamp inspection—you’ve likely connected red to negative or black to positive. Disconnect within 10 seconds to prevent damage. If polarity is correct but flashing continues, your battery voltage is below 1V. Test with a multimeter; if confirmed, the battery has failed and needs replacement. Never ignore this pattern—it can melt cables.
Rapid Red/Green Flashing: The Terminal Clean Fix
When red and green alternate rapidly (3+ flashes/second), it indicates micro-voltage drops from corroded terminals. Clean posts with a wire brush for 60 seconds—this resolves 90% of cases. Avoid sandpaper; it leaves conductive grit that worsens the problem. Reattach clamps with firm jaw pressure until you hear a solid click.
Interpret Yellow/Amber Patterns Correctly

Don’t mistake normal charging for a problem. Yellow/amber lights indicate critical charging phases that require specific responses based on temperature and battery chemistry.
Solid Yellow: Bulk Charging in Progress
This solid yellow light means your battery is charging normally during the high-current bulk phase. For a standard 50Ah car battery, expect 2-5 hours before transitioning to absorption. Never disconnect during this stage—you’ll reset the charging cycle and extend total time by 30%.
Flashing Yellow: Cold Weather Compensation
Below 32°F (0°C), flashing yellow activates automatic voltage boosts to overcome battery sluggishness. This isn’t an error—it’s essential winter operation. If your charger stops flashing yellow after warming the battery near a heater, you’ve confirmed the cause. Never disable this; charging at standard voltage in cold temps causes permanent capacity loss.
Lithium-Specific Blue Flashing
On LiFePO₄ batteries, flashing blue replaces yellow for cold compensation. The GENIUS2X4 will also drop float voltage to 13.6V (vs. 13.5V for lead-acid). If you see flashing yellow instead of blue during lithium charging, you’ve selected the wrong mode—immediately switch to LiFePO₄ setting to prevent fire risk.
Green Light Misconceptions That Wreck Batteries
That reassuring green signal often triggers dangerous assumptions. Understanding its variations prevents overconfidence and missed repair opportunities.
Solid Green: Safe for Indefinite Connection
Solid green confirms full charge and maintenance mode activation. Modern NOCO chargers like the GENIUS50 safely sustain batteries for years without overcharging. However, if green appears within 30 minutes on a known-dead battery, test voltage—it likely indicates a false positive from high internal resistance.
Flashing Green: Critical Desulfation Mode
Flashing green means repair mode is actively reversing sulfation—don’t unplug! This process takes 4-24 hours depending on battery size (e.g., 8 hours for a standard 60Ah). Interrupting it leaves crystals hardened. After completion, load-test the battery; restored capacity often jumps 20-40%.
Red/Green Alternating: The Death Knell
When red and green flash in sync, your battery has a dead cell. Confirm with a load tester: if voltage drops below 9.6V under load, replace immediately. Continuing to charge risks thermal runaway. This pattern appears on all models from GENIUS1 to GX4825—never ignore it.
Troubleshoot No-Light Failures in 3 Steps
A dead indicator usually means power issues, not charger failure. Follow this sequence before assuming you need a replacement unit.
- Verify AC power with another device—50% of “broken” chargers are plugged into dead outlets.
- Check the inline fuse (15A for GENIUS5 and smaller, 25A for GENIUS10+). Replace only with identical slow-blow fuses.
- Confirm startup self-test: All models flash white twice on power-up. No flash means internal fault requiring service.
If lights work but won’t charge, inspect clamp jaw tension. Loose connections cause intermittent yellow flashing—squeeze clamps firmly until they click when closing.
Model-Specific Light Quirks You Must Know

Generic guides miss critical variations that cause misdiagnosis. These model-specific behaviors explain why your GENIUS1 acts differently than a GENPRO.
GENIUS1 Blink Patterns Instead of Colors
With only one LED, 1 blink = charging, 2 blinks = charged, 3 blinks = error. Three rapid flashes mean reverse polarity—check clamps immediately. Never mistake single-blink cycles for malfunction; it’s normal bulk charging.
GENIUS2D Dual-LED System
The left LED shows standard colors (red/yellow/green), while the right LED turns solid orange during 13.6V supply mode for radio/memory retention. If only the right light glows, you’ve activated force mode—useful for jump-starting but not long-term charging.
Marine GENM-Series Sunlight Visibility
GENM2-4 units use polarized lenses for direct-sun visibility, making greens appear slightly blue. Ignore hue shifts—only pattern matters. A solid “blue” light in sunlight is actually green, meaning full charge.
Critical Safety Light Patterns
NOCO’s indicators double as safety alerts. Recognizing these prevents fires, explosions, and equipment damage.
Over-Temperature Shutdown Signal
Internal temps above 212°F (100°C) trigger solid red with 0.2-second blinks every 3 seconds. Unplug immediately and let the charger cool 30+ minutes. Common causes: charging in direct sun, covering vents, or attempting 50A+ charges on undersized units.
Reverse Polarity Spark Prevention
All models flash red before completing the circuit when clamps are reversed. This 2-second warning allows safe correction without sparks. If you see sparks despite the warning, your clamps are damaged—replace cables before continuing.
Firmware Update Purple Pulse
During USB-C updates (GENIUS2X4, GENPRO10X), all LEDs pulse purple for 2-3 minutes. Disconnecting mid-update bricks the charger. If purple stops prematurely, restart the update—never assume completion.
Final Diagnosis Checklist: When your NOCO battery charger indicator lights confuse you, follow this sequence: 1) Identify model-specific LED location, 2) Note exact color/pattern duration, 3) Cross-reference with this guide’s tables, 4) Perform the single most critical action (e.g., clean terminals for rapid flashing). Most “broken charger” calls stem from misreading lights—now you’ll instantly distinguish recoverable deep discharge from terminal corrosion or dead batteries. Bookmark this page; the next time red flashes unexpectedly, you’ll fix it in under a minute.


