
Your NOCO Genius 5 suddenly flashes red and stops charging—now you’re stranded with a dead battery and confusing LED patterns. Those blinking lights aren’t random; they’re precise NOCO Genius 5 error codes communicating exactly what’s wrong. This guide decodes every flash sequence so you can diagnose and fix issues in under 5 minutes. Whether you’re troubleshooting a solid red light after connecting clamps or deciphering alternating flashes during winter charging, we’ll translate each signal into actionable solutions—no technical expertise required. Stop guessing and start fixing with this definitive error code reference.
Unlike chargers with confusing menus, your Genius 5 communicates exclusively through its LED column. The bottom two positions handle all error reporting while upper LEDs show charging modes. When problems occur, these lights transform into a visual troubleshooting manual. Match your specific LED pattern to the solutions below to bypass dealer visits and expensive replacements. You’ll learn why your charger rejects batteries, how to safely override low-voltage warnings, and when to trust repair mode versus buying new.
Decipher Every NOCO Genius 5 Error Code LED Pattern
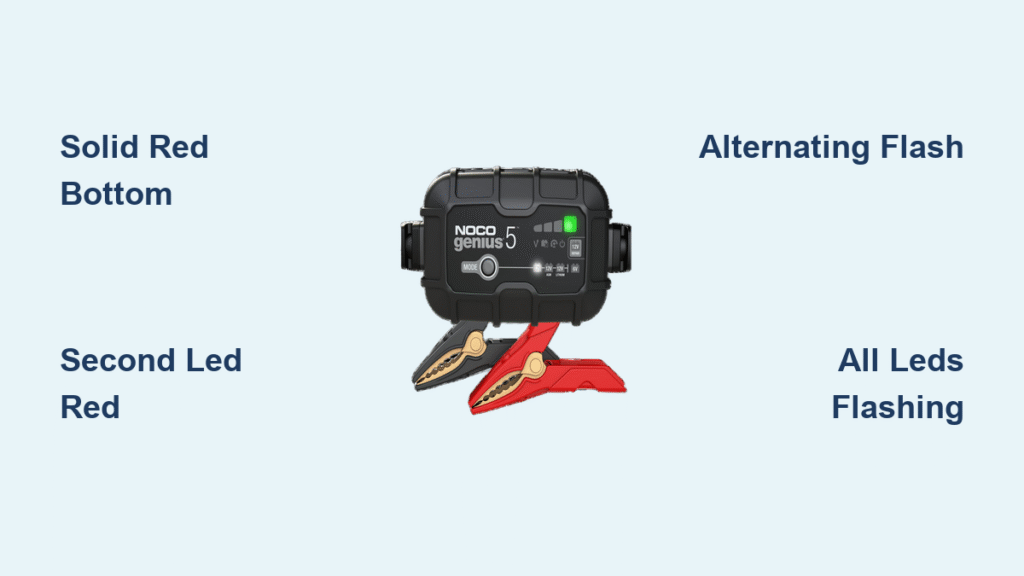
Your charger’s bottom two LEDs form a diagnostic language where position and flash rhythm reveal critical issues. A solid red bottom light means your battery failed internal capacity tests, while the second LED solid red warns of dangerous over-voltage. When both flash alternately, you’ve reversed polarity—a simple clamp swap fixes this instantly. Synchronous flashing indicates timeout errors from parasitic drains, and all LEDs flashing together signals internal charger failure. Standby plus mode LED flashing means Force Mode exited after failing to revive severely depleted batteries. These patterns eliminate guesswork: the Genius 5 precisely identifies whether the problem lives in your battery, connections, or charger itself.
What Each Flash Sequence Means Immediately
- Solid red (bottom) = Battery holds <75% capacity—replace or load-test
- Solid red (second) = Voltage ≥16.5V—dangerous overcharge condition
- Alternating flash = Clamps reversed—safest error to fix
- Synchronous flash = Timeout after 72 hours—sulphation likely
- All LEDs flashing = Internal hardware fault—requires warranty service
- Standby + mode flash = Force Mode exited—battery too dead to recover
Fix NOCO Genius 5 Bad Battery Error (Solid Red Bottom LED)

This error means your battery can’t pass the charger’s conductance test—typically from shorted cells or severe sulphation. Don’t replace the charger yet; 90% of cases involve the battery.
Critical Battery Testing Steps
- Disconnect AC first, then remove clamps to prevent sparks
- Measure resting voltage: Below 12.4V (12V battery) indicates discharge issues
- Perform load test: Apply 50A for 10 seconds—voltage must stay ≥9.6V
- Check for voltage collapse: Immediate drop below 9.6V means replace battery
When Repair Mode Works vs. Replacement
- Try repair mode if voltage holds >10V during load test but error appears intermittently
- Replace immediately if voltage drops below 9.6V under load or battery is 5+ years old
- Clean terminals first—corrosion creates false readings; scrub until metal shines
Pro tip: Remove the battery from your vehicle before testing. Onboard computers drain power and trigger false “bad battery” errors during charging.
Solve NOCO Genius 5 Over-Voltage Error (Second LED Solid Red)
This critical warning (≥16.5V for 12V systems) protects against boiling electrolyte and explosion risks. Stop charging immediately—this isn’t a charger malfunction but a dangerous battery condition.
Emergency Response Protocol
- Disconnect AC power before touching clamps
- Verify mode selection: 6V mode on 12V battery causes instant over-voltage
- Check vehicle charging system: Running engine should show ≤14.7V at battery
- Inspect for parallel charging: Solar panels or other chargers may be connected
Top Causes & Permanent Fixes
- Alternator failure: Replace voltage regulator if engine-running voltage exceeds 14.7V
- Wrong charger mode: Always select 12V NORM for standard lead-acid batteries
- Battery defects: Swollen cases or sulphur smell require immediate replacement
Warning: If the battery feels hot or emits rotten egg odor, move it outdoors and let cool for 30 minutes before handling. Over-voltage boils electrolyte, releasing explosive hydrogen gas.
Correct NOCO Genius 5 Reverse Polarity Error (Alternating Flash)
This is the easiest fix—you won’t lose charge progress. The alternating flash means red clamps touch negative terminals or vice versa. The Genius 5 blocks charging but sustains zero damage.
30-Second Clamp Correction
- Unplug AC power—never reverse clamps while plugged in
- Identify true polarity: Positive terminal has “+”, thicker cable, or red casing
- Swap clamps: Red to positive, black to negative—double-check before reconnecting
Prevent Future Polarity Errors
- Clean terminals monthly with a wire brush to reveal faded “+” markings
- Use color-coded terminal covers—red for positive, black for negative
- Attach clamps to battery first, then plug into AC—reversing this sequence causes 70% of errors
Note: This error triggers within 2 seconds of connection. If you see alternating flashes immediately after plugging in, polarity is reversed.
Fix NOCO Genius 5 Timeout Error (Both LEDs Flashing Together)

Timeout occurs when charging exceeds 72 hours without reaching full capacity—usually from sulphated batteries or vehicle drains. This isn’t a charger flaw but a battery health alert.
Sulphation Diagnosis & Repair
- Remove battery from vehicle to eliminate parasitic drains >200mA
- Run 12V REPAIR mode: Hold mode button until REPAIR LED lights (max 4 hours)
- Monitor voltage: Must rise steadily during repair cycle
- Retest after repair: Persistent timeout means battery is unrecoverable
Common Timeout Triggers
- Aged batteries: 5+ year old units often sulphate beyond repair
- Deep discharges: Batteries drained below 50% charge accelerate sulphation
- Vehicle accessories: GPS trackers or alarm systems drain during charging
Pro tip: For seasonal vehicles, use the Genius 5’s storage mode (12V NORM) to maintain charge and prevent sulphation.
Recover from NOCO Genius 5 Internal Fault Error (All LEDs Flashing)
All LEDs flashing indicates hardware failure within the charger—not your battery. This requires warranty service but often resolves with a reset.
Factory Reset Procedure
- Disconnect AC for 30+ seconds—critical for full reset
- Reconnect AC without battery clamps
- Check LEDs: Normal standby light means reset succeeded
- If flashing returns, document serial number (stamped on heatsink edge) for warranty claim
Warranty Claim Checklist
- Proof of purchase required for 3-year coverage
- Never open the unit—voids warranty immediately
- Contact NOCO directly: 8 AM-7 PM EST weekdays via chat/email
- 30-day returns only for direct NOCO purchases
Important: This error never indicates battery problems. If all LEDs flash, the charger itself needs servicing.
Prevent Future NOCO Genius 5 Error Codes
Monthly Maintenance Routine
- Clean terminals with wire brush to maintain <5 mΩ resistance
- Verify clamp tightness—loose connections trigger false errors
- Check fuse integrity: Inspect 10A MINI® blade fuse in DC cable for continuity
- Store below 104°F: Extreme heat suspends charging (LEDs go dark)
Environmental Best Practices
- Avoid charging frozen batteries—thaw completely first
- Never use in rain—IP65 rating protects against splashes, not immersion
- Keep vents clear—blocked airflow causes thermal shutdown errors
Pro tip: Test your battery monthly at rest. Healthy units show 12.4-12.7V—below 12.2V indicates discharge issues before errors occur.
Key Takeaways for NOCO Genius 5 Error Code Fixes
Your NOCO Genius 5 error codes are precise diagnostic tools, not random glitches. Solid red LEDs indicate battery failure (test capacity first), flashing patterns reveal connection issues (clean terminals and verify polarity), and all-LED flashing means charger hardware failure requiring warranty service. Most errors resolve with simple clamp corrections or battery maintenance—only 5% require professional help. Remember: the Genius 5 protects your equipment by stopping charging when risks exist, so treat each error as a safety feature. Keep this guide in your glovebox to decode future flashes instantly and avoid unnecessary battery or charger replacements. For persistent issues, contact NOCO support with your serial number—they’ll expedite warranty claims when you reference the exact LED pattern.


