
Your Stanley 300 amp jump starter sits dead on the workbench, refusing to accept a charge when you need it most. Whether you’re facing continuous flashing lights or a stubborn solid red/green pattern, this common failure leaves drivers stranded and frustrated. The good news: most charging issues stem from predictable causes you can diagnose and fix yourself with basic tools.
This guide walks through proven troubleshooting steps to restore power to your Stanley J309 or similar 300 amp models. You’ll learn to identify battery degradation, charger failures, and protection circuit issues using simple multimeter tests and visual inspections. By the end, you’ll know exactly when to replace parts versus when to seek professional service—all without wasting money on unnecessary replacements.
Decoding Stanley Jump Starter LED Warning Lights
Continuous Flashing Red Light Troubleshooting
When your Stanley 300 amp jump starter displays continuous flashing red lights, the lithium-ion battery has likely dropped below 20% capacity and can’t establish proper current flow. This pattern typically emerges after years of use as the internal battery pack degrades. The charger attempts a trickle charge but fails due to increasing internal resistance within the aging cells.
Critical Check: After 30 minutes of charging, feel the unit’s surface. No warmth indicates the charger isn’t delivering power, while excessive heat suggests a shorted battery cell. If the unit remains cool, focus your troubleshooting on the charger circuit rather than the battery itself.
Solid Red and Green LED Combination Fix
Two steady red LEDs with one green LED illuminated signals that the protection circuit has locked into a fault state. This occurs after reverse polarity jumps, short-circuited clamps, or thermal protection triggers. The battery may still be healthy, but the control board prevents charging until reset.
Immediate Solution: Disconnect both the AC adapter and any connected clamps for exactly 60 seconds. This soft reset often clears temporary fault conditions within the Battery Management System (BMS). After reconnecting, monitor the LED pattern—successful resets show steady red during charging rather than the previous solid red/green combination.
Battery Health Assessment Without Opening the Unit
Quick Voltage Check Method
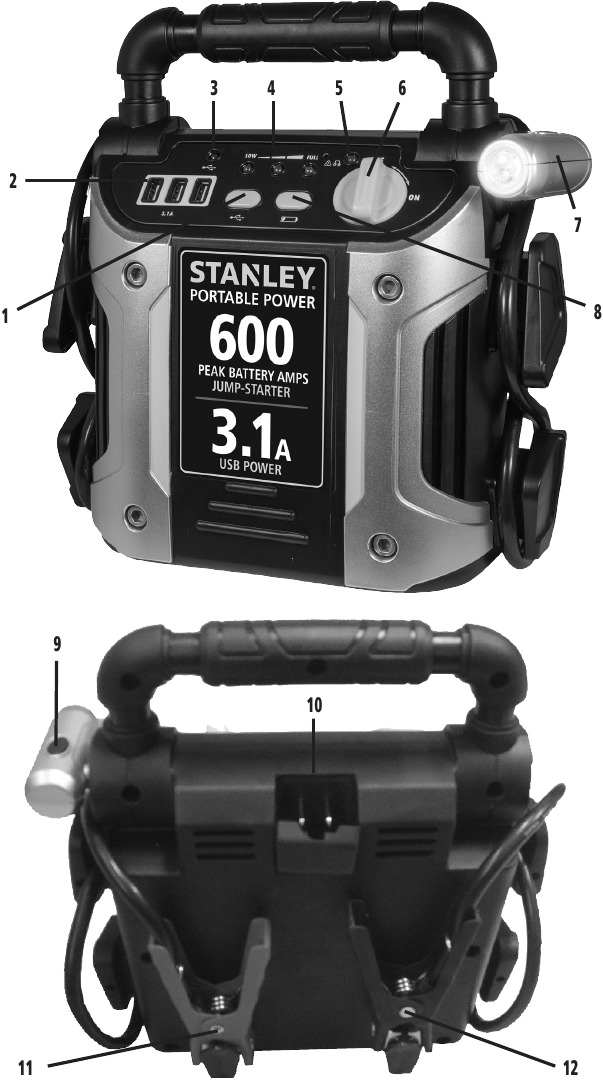
You can determine your Stanley jump starter’s battery health without disassembly using a basic multimeter. Set your meter to DC voltage and connect the probes to the main positive and negative terminals—accessible through the clamp ports even with the unit closed.
Interpretation Guide:
– 12.6V+: Battery likely functional, investigate charger issues
– 10-12.5V: Partially discharged but potentially recoverable
– Below 10V: Severely degraded cells requiring replacement
Pro Tip: Test voltage immediately after unplugging from the charger. A healthy battery should maintain 12.6V+ for at least 30 minutes. Rapid voltage drop indicates failing cells.
Simple Load Test with Automotive Bulb
For batteries showing 10-12.5V, perform this crucial load test using a common 12V automotive bulb (a 55W brake light bulb works perfectly). Connect the bulb across the battery terminals for exactly 30 seconds while monitoring voltage.
Pass Criteria: Voltage stays above 11V under load
Fail Signal: Voltage collapses below 9V indicates end-of-life cells
Safety Note: If the bulb barely glows or the voltage plummets within 5 seconds, stop testing immediately—the battery cannot deliver meaningful current and needs replacement.
AC Adapter and Charger Circuit Diagnosis

External Power Supply Verification
Before disassembling your unit, verify the AC adapter functionality with these three checks:
- Cross-Device Test: Plug the adapter into another 12V device like a router or external hard drive
- Cable Integrity Check: Wiggle the cable near the strain relief while plugged in—intermittent power indicates internal wire breaks
- Physical Inspection: Look for cuts, kinks, or melted insulation along the entire cable length
Replacement Insight: Any 12V 1A adapter with a 5.5mm × 2.1mm center-positive barrel connector works as a replacement. Auto parts stores carry universal adapters for $8-12 that solve this issue 30% of the time.
Internal Converter Voltage Test
If the external adapter tests good, the internal 12V converter may have failed. This small PCB-mounted module sits behind the rear cover and requires basic disassembly:
- Remove the four housing screws and carefully open the unit
- Plug in the AC adapter while monitoring with your multimeter
- Measure DC output at the converter’s secondary side (red/black wires)
- Compare readings to expected 12.0-13.5V range
Failure Indicator: No voltage output despite good external adapter means the internal converter has failed. Replacement modules (Part #J309-PSU) cost $15-20 online and install in under 10 minutes with basic soldering skills.
Battery Replacement Made Simple
Correct Battery Pack Identification
Stanley 300 amp units use 12V 6-8Ah lithium-ion packs with built-in BMS protection. Physical dimensions are typically 150mm × 65mm × 95mm, but always verify before ordering to avoid compatibility issues. Search specifically for “Stanley J309 replacement battery” to find the correct model.
Reliable Purchase Sources:
– Amazon: Verified sellers offering $25-35 packs with 30-day returns
– Battery specialty stores: Higher quality packs for $30-45 with warranty
– Local auto parts stores: Often carry universal lithium jump starter batteries
Step-by-Step Battery Installation
Follow this precise sequence to replace your Stanley jump starter’s battery:
- Disassemble: Remove rear cover screws and cut warranty sticker carefully
- Document Connections: Take photos of wire routing before disconnecting
- Disconnect Old Battery: Unplug the 2-pin connector (note red = positive)
- Install New Pack: Route leads through original strain relief channels
- Secure Properly: Use double-sided tape or foam spacers to prevent movement
- Condition New Battery: Perform a full 12-hour initial charge before first use
Critical Warning: Never force connectors or reverse polarity—lithium batteries can ignite if improperly handled. Verify connections match your documentation photos before powering on.
Prevent Future Charging Failures with Proven Techniques
Optimal Storage Conditions for Longevity
Store your Stanley jump starter at 40-60% charge in cool, dry conditions to maximize battery lifespan. Lithium cells self-discharge approximately 2% monthly, so top off every 3 months if unused. Create a maintenance calendar reminder to prevent deep discharge damage.
Ideal Storage Environment:
– Temperature: 15-25°C (59-77°F)—avoid garages that exceed 30°C in summer
– Humidity: 40-60% relative—use silica gel packs in storage containers
– Location: Away from direct sunlight and heat sources like radiators
Usage Patterns That Extend Battery Life
Avoid these common mistakes that accelerate battery degradation:
– Don’t jump more than 5-6 vehicles consecutively without cooling periods
– Allow 15-minute cool-down between heavy uses to prevent thermal stress
– Recharge within 24 hours after each use to maintain optimal chemistry
Pro Maintenance Tip: After each jump-start, clean the clamps with a wire brush and apply dielectric grease to prevent corrosion that mimics charging problems. Store clamps in the provided case to minimize moisture exposure.
When to Skip DIY Repair and Call a Professional
Red Flags Indicating Professional Service Needed
Seek expert help immediately if you observe:
– Battery swelling visible through housing seams
– Burnt smell or visible charring on internal components
– Discolored PCB traces indicating electrical arcing
– Lack of essential tools like a multimeter or soldering station
Cost-Benefit Analysis: Authorized depot repair costs $40-60, which may exceed the value of older units. Compare this against new Stanley 300 amp models priced at $60-80—sometimes replacement makes more financial sense than repair.
Safety Threshold for Non-Technical Users
If you’re uncomfortable working with lithium batteries or lack basic electronics knowledge, professional service prevents potential fire hazards. Lithium-ion packs can deliver dangerous currents if shorted during DIY attempts. When in doubt, invest in a new unit rather than risking injury.
Stanley Jump Starter Charging Troubleshooter Checklist
Run through this diagnostic sequence before ordering parts:
External Checks (2 minutes):
– [ ] Test AC adapter on another 12V device
– [ ] Try different wall outlet with known-working appliance
– [ ] Clean external terminals with isopropyl alcohol
Basic Tests (5 minutes):
– [ ] Check battery voltage with multimeter
– [ ] Perform soft reset (disconnect all power for 60 seconds)
– [ ] Monitor for heat during 30-minute charge attempt
Advanced Diagnosis (10 minutes if comfortable):
– [ ] Open housing and inspect for visible damage
– [ ] Measure converter output voltage under load
– [ ] Load test battery with 55W automotive bulb
Your Stanley 300 amp jump starter can often be revived with these targeted fixes. Battery replacement solves 70% of charging issues, while charger circuit problems account for most remaining cases. Keep this guide accessible for future reference, and maintain your unit properly to avoid repeat failures. Remember: proper storage and regular charging cycles extend your jump starter’s lifespan significantly—don’t wait for failure to implement these preventive measures. When in doubt, professional service remains a cost-effective option for complex electrical faults that exceed your comfort level.


